
Craft 4-Wheeler Extended is animation tool for 4-wheel vehicles (cars, trucks, ATV and more). This animation tool makes it easy for the user to create realistic simulations for vehicles in motion. The vehicle is controlled using an input device or animating a target mesh directly through 3ds Max or Maya. The user rigs the model that will be rendered with Craft 4-Wheeler Extended for it to inherit its movement. Steering, braking, throttle, skidding, etc. is performed in real-time with a DirectX input device (gamepad, joystick steering wheel), keyboard, or by the use of animating a TargetMesh (follow a spline).
The 4-Wheeler behavior can be edited to match the desired behavior of your model.
The surface on which Craft 4-Wheeler Extended drives can take any shape, be upside down or twist oddly. Surfaces can even be animated during recording with Craft 4-Wheeler Extended.
Craft 4-Wheeler Extended can also be combined with other products from Craft Director Studio. For example: it is possible to use Craft Extra Wheel and Craft Trailer together with Craft 4-Wheeler Extended to create a semi-truck.
|


When Autonomous mode has been activated, Craft 4-Wheeler Extended will pursue 4WheelerExt_TargetMesh. This, for example, enables Craft 4-Wheeler Extended to follow a spline.
Directions for Craft 4-Wheeler Extended to follow a track (spline):


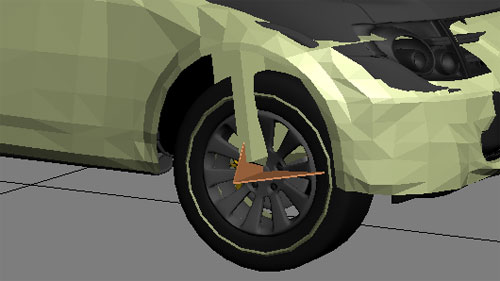
For the rigging of a brake system there is a mesh called WheelCenterMesh on each wheel. This mesh is always centered to the wheel it belongs to. The mesh turns with the wheel but does not rotate with it. Here is how you rig a brake system.


 The hierarchy of the brake system:

For the rigging of a suspension system there is a mesh called WheelCenterSuspensionMesh on each wheel. This mesh is always centered to the wheel it belongs to. The mesh does not turn with the wheel and does not rotate with it. It is also useful to use the Craft Suspension tool (freeware).


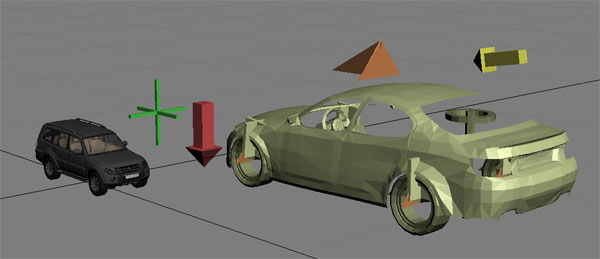
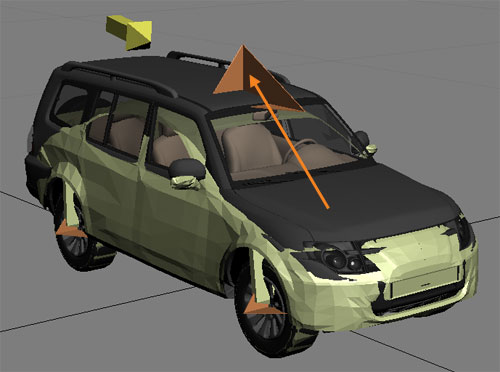
By using the chassis relocator (see illustration, 4WheelerExt_01_ChassisRelocatorMesh), the animation can be fine-tuned after the recording has taken place. The chassis relocator can be keyframed according to specific needs.
Maneuver example:

Accelerates the vehicle forward or backward.


Turns the vehicle right or left.


Gives the vehicles a boost in velocity.

The vehicle will brake as much as possible without locking the wheels until it comes to a stop. If a digital input (i.e. a button) is used, you will brake with full force directly. If an analog input used, you’re able to control how much force you’re braking with.


Used to control the vehicle’s skid. The vehicle’s rear wheels lose traction.


Locks the wheels and brakes the vehicle until it comes to a stop.


Simulates driving on gravel.


The rear wheels spin to create a burnout.


Creates an external force on Craft 4-Wheeler Extended/4-wheeler pointing in the same direction as the 4WheelerExt_01_ExternalForceMesh. For example this can simulate a car changing gears or a car that is heavily loaded.


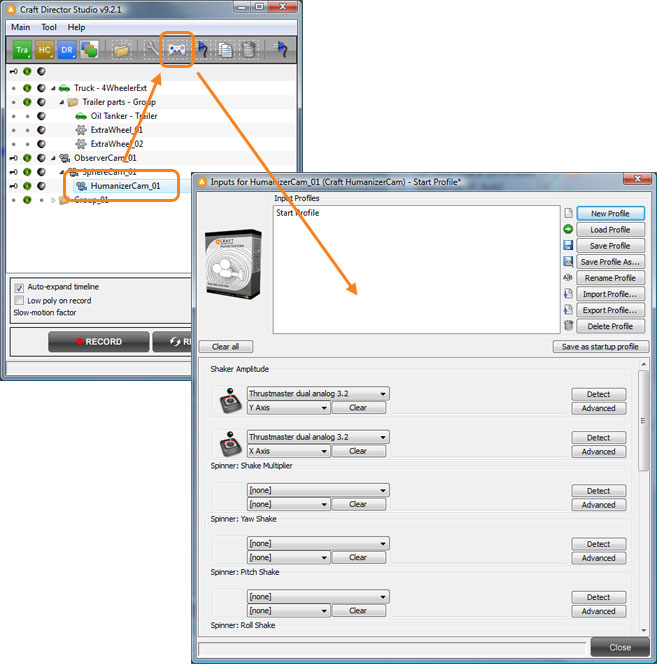
Spinners enables the change of parameter values with an input controller in real-time.
Initial Velocity (% of max)
It is the first of three ways to have an initial velocity if larger than zero where it is specified as a percentage of the maximum velocity. Second is to use a keyframed initial velocity. Third is to use a non-zero input value when record is pressed.
Multiplier
This value is pre-multiplied to the ‘Current Velocity’ below. Eg if the system unit is meters a multiplier value of 1 yields m/s. If the multiplier is 3.6 the result is km/h.
World Space Maximum Velocity Gauge
This is a gauge outputting the maximum velocity the 4-wheeler can have (except when using booster). The value is in ((units per second)*multiplier)*(maximum gas pedal value)*(the scale of the 4-wheeler)..
Current Velocity
This is not a value you can input. The measured current velocity of the vehicle in system units per second times the ‘Multiplier’ above.
Current Velocity (% of max)
This is not a value you can input. The current velocity of the vehicle in percent of the maximum velocity.
World Space Acceleration Gauge (seconds from 0 to 100)
This is a gauge outputting the number of seconds it would take to acceleration the 4-wheeler from 0-100 (except when using booster). The value is in seconds = ((100/multiplier)/Acceleration)/scale.
World Space Acceleration Gauge (seconds from 0 to 60)
This is a gauge outputting the number of seconds it would take to acceleration the 4-wheeler from 0-100 (except when using booster). The value is in seconds = ((60/multiplier)/Acceleration)/scale.
Re-Initialize Car Attributes
Use this button to re-initialize the car’s physical attributes. This can be used if you have changed the physical appearence of the dummy model after an animation already has been recorded.
Hide Helpers
Hides the Helpers.
Hide Helpers During Recording
Hides the Helpers during recording.
Hide Follow Camera
Hides the Follow Camera.
Hide Driver Camera
Hides the Driver Camera.
Hide TopView Camera
Hides TopView Camera.
Enable Seamless Transitions
Enable Seamless Transitions requires more memory usage.
Keyframe only essential objects
Only the the body, the wheels and the gravityDirectionMesh will be keyframed.
Autonomous mode
Check this box to enable Autonomous mode.
Autonomous mode follow strength
This factor decides how tightly the car follows the target.
Follow Strength Response Factor
This value determines how much of the car’s speed is used to follow the target. E.g. if the value is 1, 100% of the car’s speed is used.
Auto-Steering Response factor
This value determines how much of the car’s steering is used in order to steer towards the target. E.g. if the value is 0.3, 30% of the car’s steering is used.
Reverse Max Vel Mult
When the 4-Wheeler applies a reverse force in autonomous mode this value will be applied to the maximum velocity parameter.
Ignore Sphere Radius (length relative)
Determines the size of the virtual sphere around the TargetMesh. If Craft 4-Wheeler Extended’s CarBodyMesh comes into the area of the sphere it stops following the TargetMesh and will come to a stop. If Craft 4-Wheeler Extended’s CarBodyMesh is outside the sphere it will start to follow the TargetMesh again.

Maximum Steering Change Velocity
How fast the wheels can turn in rads per seconds.

(0.5 / 1 / 3)
Speed Dependent Turn Radius Reduction Factor
By this factor the turn radius will be decreased linearly with the car velocity.

(0.2 / 0.4 / 0.6)
Steering Noise
Adds noise to the steering.
Steering Wheel Rot Mult
Multiplies the steering wheel mesh rotation with this value.
Turn Base (Back Wheel Relative)
Change this value to change the vehicle’s turn base. A value of 1.2 will move the turn base to the front wheels and a value of 0.6 will make the vehicle turn with all wheels (these values will not apply if you move Craft 4-Wheeler’s wheels).

(0 / 0.5 / 1.2)
Front Stiffness
The Stiffness determines how much force the springs have.
Front Damping
The Damping determines how dull the dampers are.

(100 / 1000 / 2000)
Back Stiffness
The Stiffness determines how much force the springs have.

(0 / 2500 / 10000 )
Back Damping
The Damping determines how dull the dampers are.

(100 / 1000 / 2000)
Tire Pressure
Can be used as a wheel air pressure parameter. The parameter may cause instability when too low. For wheel deformations a lattice/FFD is required as well as raytracing for the boundaries.
Maximum Forward Tilt Angle
The maximum angle the car body can have in the forward direction.
Maximum Side Tilt Angle
The maximum angle the car body can have sideways.
Booster Stiffness Multiplier
Increases the Stiffness by this factor times the booster value.

(0.1 / 0.3 / 5)
Mass Multiplier
Mass Multiplier. A greater value = a heavier vehicle.

(0.5 / 1 / 2)
Fixate Wheel Center Nodes
When checked the WheelCenterMesh will not turn with the wheel yaw.
Move WheelCenterMesh to ground hit point
If checked the WheelCenterMesh will be moved to the point where the wheel meets the ground. If the wheel is in the air it will be moved to the bottom of the wheel.
Align WheelCenterMesh to ground incline
If this box is checked the WheelCenterMesh will point down – ie stand at a perpendicular angle to the ground’s incline at the point where the wheel touches ground. (Hint: this can be used for snowmobiles and similar vehicles by making the wheels small and attaching the skis to the WheelCenterMesh. Otherwise the WheelCenterMeshes is useful for particle effects and suspension).
Use Reverse As ABS Brake
When this box is checked the applying a negative gas pedal value yields in an ABS brake action.
Skidding Offset Value
This value is added to the input device value for ‘Skidding’ as an offset. 0 = No skidding added by default, 1 = fully initiated skidding by default
Skidding Release Value (Lateral Vel Rel)
When the car reaches this sideway velocity during a turn the car will automatically generate a ‘Skidding’ input device signal.
Skidding Release Response Factor
Determines how fast the car will stop skidding.
Gravel Shake Offset Value
This value is added to the input device value for ‘Gravel Shake Amplitude’ as an offset.
Gravel Roughness
How rough the gravel shake is.

(0.25 / 0.5 / 1)
External Force Offset Value
This value is added to the input device value for ‘External Force’ as an offset.
Skid Brake Stop Factor
Determines how fast the car should come to a stop when the skid brake is released. If larger than 1 it will stop faster once the input for skid brake is released. A low number like 0.1 is better to use when creating skid brake/handbrake turns.
(0.2 / 0.4 / 0.8)
Skid Brake Rot Rot Brake Multi
A lower value will make the 4-Wheeler rotate more during skidding.
0 = Does not slow down the rotations during skid breaking.
3 = will make the cars rotations stop instantly and just slide.
For doing skid brake/handbrake corners it is recommended to have this set to 1 or lower.
Burnout Shake
How much the car should shake during a burnout.

(1 / 2 / 5)
Burnout Tilting Force
How much the car chassis should be tilted during a burnout.

(3 / 5 / 15)
Burnout Fadeout Factor
How fast the burnout dies out.
Random Seed Adder
Adds this number to the initial random seeds to generate unique numbers.
World Avoidance Sphere
This value times the scale of the car is the radius of the sphere of outside of which the car will try to get back inside..
Wheel Radius Multiplier
This factor is multiplied internally to change the wheel radius. When smaller than 1.0 the effective radius is decreased making the tire penetrate the surface to give possibility for tire pressure building.
Gravity
Gravity.

(0 / 0.5 / 0.99, 1 = max)
Enable Wheel Ground Release
Enables the 4-Wheeler’s wheels to release from the ground (formerly called Jumping Mode).
Suspension Length (Radius Relative)
The maximum distance the wheels can be extended from the initial location, wheel radius relative. Setting this value to 0 turns it off.
Maximum Wheel Extension Velocity (Radius Rel)
The maximum body relative wheel velocity (times the radius). Setting this value to 0 turns it off.
Ray Multiplier
Increasing the ray multiplier will increase wheel ground detection accuracy but will increase the computation time.
Cast Rays at Wheel Edges
When checked rays will also be cast at the sides of the wheels which means the number of rays are tripled. The ray multiplier must be larger than one for this to have an effect.
Degrees Per Ray
How many degrees will be added for each extra ray forward and backwards, seen from the center of the wheel straight down. However, the maximum degree a ray is cast is 85 degrees.
Use Fast Ray Cast
If checked and internal ray caster is used yielding considerably faster calculations, but only non-animated surfaces may be used. The method also requires much more memory..
Store Ground Mesh Data
Stores the mesh data. Once checked the data will be stored, if the mesh is rebuilt you need to do a re-checking.
Acceleration (scale relative)
How fast the 4-wheeler Extended can accelerate (Acceleration*((units per second)*multiplier)*(the scale of the car).
Gas Pedal (Forw/Backw) Response Factor
How fast the 4-Wheeler Extended accelerates to its maximum velocity “Gas Pedal (Forw/Backw) Maximum” and how quick decelerates. 1=instant. 0=disabled
Gas Pedal (Forw/Backw) Maximum
Maximum velocity of the vehicle.
Steering Wheel (Right/Left) Response Factor
How fast the vehicle will reach its maximum turning value. 1=instant. 0=disabled
Steering Wheel (Right/Left) Maximum
The turn radius of the vehicle.
Booster Response Factor
How fast the vehicle accelerates when using the booster. 1=instant. 0=disabled
Booster Maximum
Maximum velocity when using the booster (value is multiplied with Gas Pedal Maximum).
ABS Brake Response Factor
How fast the vehicle will brake (is not used).
ABS Brake Maximum
How effective the brake is. Raise value = more effective. Lower value = less efficient.
Skidding Response Factor
Response time for the vehicle to begin skidding. 0 = distabled, 1 = instant skidding maximum.
Skidding Maximum
The maximum value for a skid.
Skid Brake Response Factor
Affects how quick the skid brake reaches it’s set maximum value. 1=instant. 0=disabled
Skid Brake Maximum
Affects how much friction the vehicle has during skid braking. At 1 it stops right away. At 0 the will continue to slide as if there is no friction at all.
Gravel Shake Amplitude Response Factor
The response time for the Gravel Shake. 1=instant. 0=disabled
Gravel Shake Amplitude Maximum
Determines how hard the vehicle will shake.
Burnout Response Factor
Determines how fast the back wheels will accelerate during a burnout. 1=instant. 0=disabled
Burnout Maximum
Maximum velocity for the back wheels during a burnout.
External Force Response Factor
This value determines how fast 4-Wheeler Extended will respond to the External Force. 1=instant. 0=disabled
External Force Maximum
This value determines how much force is applied by the External Force.
 Optimizing the scene