
Using Craft Crawler Extended
|
 Optimizing the scene
- Create a Craft Crawler Extended.
- Configure the controls for Craft Crawler Extended (using an analog input device is recommended).
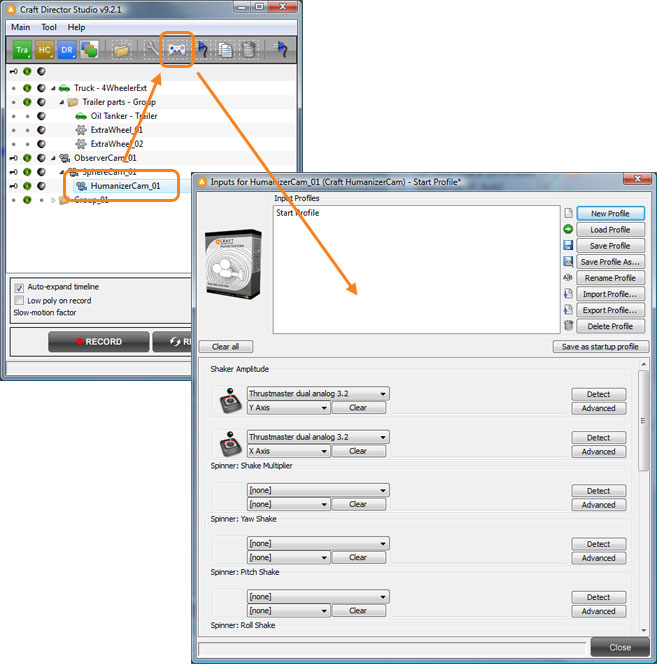
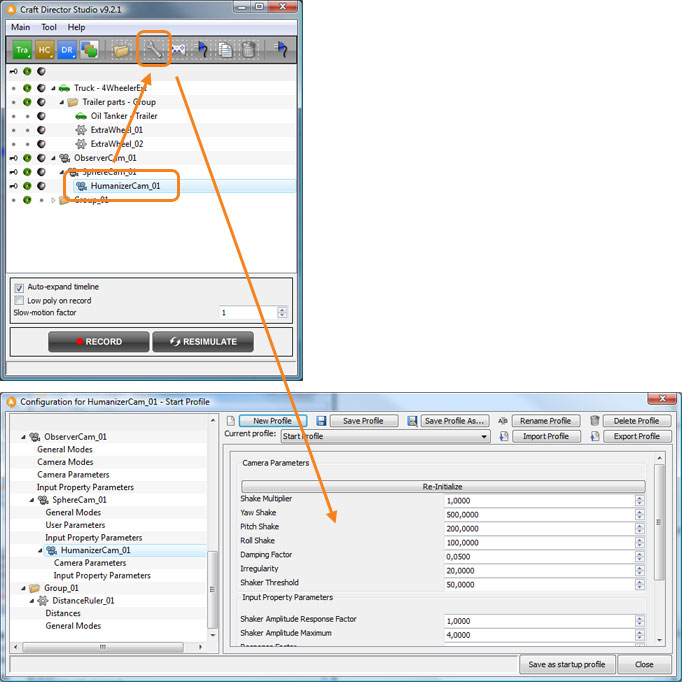
Highlight Craft Crawler Extended in the tool tree list then click the Inputs button. This will open the inputs for Craft Crawler Extended.
- Align Craft Crawler Extended’s body (CrawlerExt_CrawlerBody) at the same position as the high poly model’s body. It might be wise to use wireframe mode so that only the outlines are visible. Keyboard shortcut for wireframe in 3ds Max is F3 and 4 for Maya.
- Move and rescale Craft Crawler Extended’s body so that it is placed in the same position and has roughly the same size as the high poly model’s body.
- Align Craft Crawler Extended’s wheels (CrawlerExt_Wheel_BR, _BL, _FR & _FL) to the wheels on the high poly model. Make sure that they are centered in the middle of the high poly model’s wheels.
- Rescale Craft Crawler Extended’s wheels so that they’re the same size as the high poly model’s wheels.
- Link/Parent (Maya hotkey: p) the high poly model’s body to Craft Crawler Extended’s Chassis Relocator (CrawlerExt_ChassisRelocator).
- Link/Parent (Maya hotkey: p) the high poly model’s wheels to each of Craft Crawler Extended’s respective wheels.
- To make sure that the recording runs as smooth as possible, click the “Toggle visibility on selected high-poly objects” icon (
 ) to hide all the high poly model’s parts.
 - Link/Parent (Maya hotkey: p) the red arrow under Craft Crawler Extended (CrawlerExt_GravityDirection) to the surface that it is going to interact with (drive on). The vehicle will then follow this surface.
Please note: It can only be bound to one surface. - To get a better view when maneuvering Craft Crawler Extended, change viewport to one of the following cameras:
- DriverCam which is placed approximately at the height of a drivers head in an ordinary tank. Its position can be changed if needed.
- TopCam follows the Craft Crawler Extended 25 scaled units above the roof helping the driver to perform pinpoint navigation in tight spaces.
- FollowCam follows the Craft Crawler Extended smoothly from a third person view.
- Click Record in Craft Director Studio’s main window to start recording. Maneuver Craft Crawler Extended with the input settings configured earlier and drive the desired route. Craft Crawler Extended’s movement will be saved during the duration of the recording. Click Stop to stop the recording.
- If the recording is not satisfactory drag the timeline back to any position desired and continue to re-record from there. This way the entire recording does not have to be redone.
- By using the Countdown feature, it’s possible to grasp the input device and get ready before the recording starts (you can find the Countdown setting in the Main Configuration). You can find the settings for Countdown in the Craft Director Studio Preferences. Craft Director Studio Preferences can be opened from the main menu.
- To make it easier to maneuver tricky parts in the animations, use the Slow-motion factor in Craft Director Studio’s main window.
- Unhide the high poly model and hide the dummy model (
 + ).
+ ). - Render.
Autonomous mode
When Autonomous mode has been activated, Craft Crawler Extended will pursue CrawlerExt_Target. This, for example, enables Craft Crawler Extended to follow a spline (or any moving object).
Directions for Craft Crawler Extended to follow a track (spline):
- Create a Craft Crawler Extended.
- In the Craft Director Studio main window, select Craft Crawler Extended and open the Configure window by clicking on the Configure button. In the Configure window, check Autonomous mode.

- Create the track for Craft Crawler Extended to follow (NURBS CV Curve is recommended).
- 3ds Max:
Select CrawlerExt_Target and under the menu Animation, choose Constraints and finally Path Constraints.
Select the path created in step 2 and CrawlerExt_Target will follow this track.
- Maya:
Select CrawlerExt_Target, hold down shift and select the path created in step 2.
Open the Animation menu. Under Animate, choose Motion Paths and finally Attach to Motion Path.
- 3ds Max:
- Press Record to make Craft Crawler Extended follow the track. You can maneuver away from the track and control Craft Crawler Extended on your own at any given time. However, as soon as you release the controls, Craft Crawler Extended will steer back towards CrawlerExt_Target.

- It is possible to change the different parameters that affect how Craft Crawler Extended will follow CrawlerExt_Target. For example Autonomous mode follow strength value in the Configure window.
Relocators
By using the relocators (see illustration below), the animation can be fine-tuned after the recording has taken place. The relocators can be keyframed according to specific needs.
- Drag the timeline to the position where the maneuver will start.
- Select the desired relocator and insert a key.
- Drag the timeline to the new position where the maneuver will end and insert a new key.
- Move and keyframe the relocator along the path it will take between the first and last key.
Maneuver example: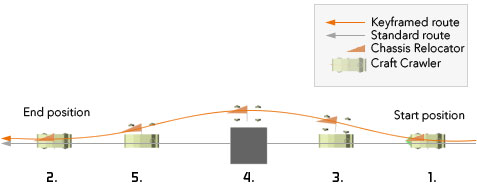
Input settings
Gas Pedal (Forw/Backw)
Accelerates the vehicle forward or backward.
Steering Wheel (Right/Left)
Turns the vehicle right or left. 
Booster
Gives the vehicles a boost in velocity.
ABS Brake
The vehicle will brake as much as possible without locking the wheels until it comes to a stop.
Skidding
Used to control the vehicle’s skid. The vehicle loses traction.
Gravel Shake Amplitude
Simulates driving on gravel.
External Force
Creates an external force on Craft Crawler Extended pointing in the same direction as the CrawlerExt_ExternalForce. For example this can simulate a tank changing gears or a tank firing
Spinner…
Spinners enables the change of parameter values with an input controller in real-time.
Configure
Gauges
Initial Velocity (% of max)
This is the first of three ways to have an initial velocity (larger than zero). Here, the velocity is specified as a percentage of the maximum velocity. The second way is to use a key-framed initial velocity. The third is to use a non-zero input value when record is pressed – i.e. press down the gas pedal before you start recording.
Multiplier
This value is pre-multiplied to the Current Velocity below. Eg if the system unit is meters a multiplier value of 1 yields m/s. If the multiplier is 3.6 the result is km/h.
Current Velocity
This is not a value you can input. The measured current velocity of the vehicle in system units per second times the Multiplier above.
Current Velocity (% of max)
This is not a value you can input. The current velocity of the vehicle in percent of the maximum velocity.
General Modes
Re-Initialize Crawler Attributes
Press to enable re-initialization of the Craft Crawler Extended’s physical attributes.
Hide Helpers
Hides the Helpers.
Hide Helpers During Recording
Hides the Helpers during recording.
Hide Follow Camera
Hides the Follow Camera.
Hide Driver Camera
Hides the Driver Camera.
Hide TopView Camera
Hides TopView Camera.
Enable Seamless Transitions
Enable Seamless Transitions requires more memory usage.
Autonomous Mode
Autonomous mode follow strength
This factor decides how tightly the Craft Crawler Extended follows the target.
Follow Strength Response Factor
This value determines how much of the speed is used to follow the target. E.g. if the value is 1, 100% of the speed is used.
Auto-Steering Response Factor
This value determines how much of the steering is used in order to steer towards the target. E.g. if the value is 0.3, 30% of the steering is used.
Ignore Sphere Radius (length relative)
This sets a virtual sphere around the front of the Craft Crawler Extended which is the distance at which the Craft Crawler Extended will begin to react to the TargetMesh. I.e. the TargetMesh must be outside this sphere to move the Craft Crawler Extended. The radius is multiplied by the length of the Craft Crawler Extended.
Steering Parameters
Maximum Steering Change Velocity
How fast the wheels can turn.
Speed-dependent Turn Radius Reduction Factor
This factor decreases the turning radius linearly in proportion to the Crawler Extended’s velocity.
Suspesion Parameters
Fixate Wheel Bottom Nodes
When this option is checked, the WheelBottomMesh will not turn with the wheel, but will remain perpendicular to the vehicle’s body.
Stiffness
The Stiffness determines how much force the springs have.
Damping
The Damping determines how dull the dampers are.
Booster Stiffness Multiplier
Increases the Stiffness by this factor multiplied by the booster value.
Mass Multiplier
Mass Multiplier. A greater value = a heavier vehicle.
General Parameters
Skidding Offset Value
This value is added to the input device value for ‘Skidding’ as an offset.
Skidding Release Value (Lateral Vel Rel)
When the Craft Crawler Extended reaches this sideways velocity during a turn it will automatically generate a ‘Skidding’ input device signal.
Skidding Release Response Factor
Determines how fast the Craft Crawler Extended will stop skidding.
Gravel Shake Offset Value
This value is added to the input device value for ‘Gravel Shake Amplitude’ as an offset.
Gravel Roughness
How rough the gravel shake is.
External Force Offset Value
This value is added to the input device value for ‘External Force’ as an offset.
Ray Cast Parameters
Ray Multiplier
This is the way the wheels detect the ground mesh. A ray is sent from the center of the wheel towards the ground, and the bottom of the wheel is brought to the nearest point on the ground. Since the wheels are circular, one ray will only produce correct ground interaction with completely flat ground. If the ground angles up or down, or if the ground has bumps you will need to increase the number of rays – so that the ground can be detected when it comes into contact with the wheel on a point other than the bottom of the wheel. However, increasing the ray multiplier will increase accuracy but will increase the computation time.
Hint: first run your animation with a low setting and then rewind the time line. Raise the number or rays and press Re-Simulate. The entire animation will be re-calculated with greater accuracy.
Degrees Per Ray
Interval in degrees between each extra ray cast forward and between each ray cast backwards. The starting point is at the bottom of the wheel in the center.The maximum degree a ray is cast is 85 degrees; i.e. nearly horizontal.
Number of Side Rays
Increasing the amount of side rays will increase accuracy at the sides of the wheel but will also increase the computation time. Hint: first run the animation with a low value on this setting and then move back the time line to the beginning, enter a higher number of rays and press Re-Simulate. The whole animation will be re-calculated in the space of a few minutes, but with the correct wheel-ground interaction.
Input Property Parameters
Gas Pedal (Forw/Backw) Response Factor
How fast the vehicle accelerates and decelerates.
Gas Pedal (Forw/Backw) Maximum
Maximum velocity of the vehicle.
Steering Wheel (Right/Left) Response Factor
How fast the vehicle will turn.
Steering Wheel (Right/Left) Maximum
The turn radius of the vehicle.
Booster Response Factor
How fast the vehicle accelerates when using the booster.
Booster Maximum
Maximum velocity when using the booster (value is multiplied with Gas Pedal Maximum).
ABS Brake Response Factor
How fast the vehicle will brake (is not used).
ABS Brake Maximum
How hard the vehicle will brake.
Skidding Response Factor
Response time for the vehicle to begin skidding.
Skidding Maximum
The maximum value for a skid.
Gravel Shake Amplitude Response Factor
The response time for the Gravel Shake.
Gravel Shake Amplitude Maximum
Determines how hard the vehicle will shake.
External Force Response Factor
This value determines how fast Craft Crawler Extended will respond to the External Force.
External Force Maximum
This value determines how much force is applied by the External Force.