
Using Craft DirectInputLink
 Optimizing the scene Optimizing the scene
It’s wise to optimize the scene before starting to recording the animation. The scene is optimized by decreasing the amount of polygons shown during the recording. This is achieved by hiding objects not crucial to the part of the scene to be animated. Another tip is to use Craft Bounding Poly, which temporary lowers the amount of polygons for selected objects and allows for a smoother recording. |
- Create a Craft DirectInputLink.
- Configure the controls for Craft DirectInputLink (analog input device is recommended). Click on Input settings under the Tool menu in Craft Director Studio’s main window.
- Craft DirectInputLink can be used to animate the landing gear of an airplane.
Position Craft DirectInputLink so that the ActuatorMesh has approximately the same position as the object that will be linked/parented to it.
- Link/parent the RelativeCageMesh to the airplane.
- Link/parent the landing gear to the ActuatorMesh.
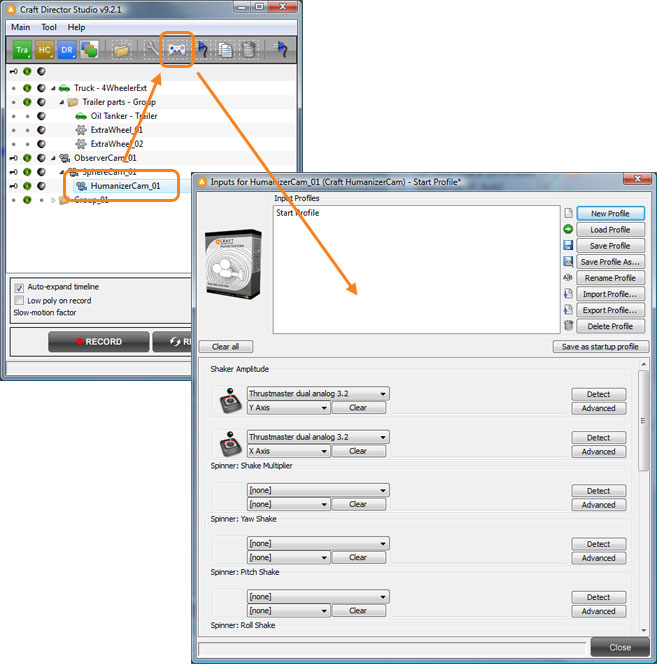
- Make sure that Craft DirectInputLink is selected in the Tool control list and click on Input settings under the Tool menu.
- Configure an input device for Pitch (Up/Down). Close the Input settings window.
- Make sure that Craft DirectInputLink is selected in the Tool control list and click on the Configure button in the Craft Director Studio interface.
- Check the box next to Pitch (Up/Down) Keep Trinary State This enables the landing gear move up/down at the press of one single button, and remain in the up or down position once you have moved them. Close the Configure window.
- It is highly recommended that you optimize your scene by hiding all unnecessary polygons (especially any high-poly models). Not doing this may cause the animation to go slowly and hack.
- Press Record in Craft Director Studio’s main window to start recording Craft DirectInputLink. Use the input device you have designated for Pitch (Up/Down) to extend and retract the landing gear. Craft DirectInputLink’s movements are saved in real time as the recording progresses. Press Stop to stop the recording.

- If the recording is not satisfactory drag the timeline back to any position desired and continue to rerecord from there. This way the entire recording does not have to be redone.
- By using the Countdown feature, it’s possible to pick up the input device and get ready before the recording starts (you can find the Countdown setting in the Main Configuration).
- To make it easier to maneuver tricky parts in the animations, use the Slow-motion factor in Craft Director Studio’s main window.
- Unhide the models again.
- Render.
Input settings
Forw/Backw Transl
Moves the ActuatorMesh forward or backward.
Right/Left Transl
Moves the ActuatorMesh right or left.
Up/Down Transl
Moves the ActuatorMesh up or down.
Yaw (Right/Left)
Rotates the ActuatorMesh right or left.
Pitch (Up/Down)
Rotates the ActuatorMesh up or down.
Roll (Right/Left)
Rolls the ActuatorMesh right or left.
Spinner…
Spinners enables the change of parameter values with an input controller in real-time.
Config settings
General Modes
Hide Helpers
Hides the helper objects.
Hide Helpers during Recording
Hides the helpers during recording.
Hide Camera
Hides the camera.
Input Property Parameters
|
Craft DirectInputLink has many different possibilities for types of motion. This article will explain principles that are applicable to all directions of rotation and translation. At the end of the article a few concrete examples will be given. There are three axes of motion: Forward/Backward, Right/Left and Up/Down. There are also three types of rotation corresponding: Yaw, Pitch and Roll. In each case you have the option of checking two boxes called Keep Trinary State and Integrate. The input settings are given the names ‘Forw/Backw Keep Trinary State‘ or ‘Pitch Up/Down Integrate‘. The principles are the same. There are then four different possibilities for these check-boxes. In the following explanations (0) indicates that a given check-box is not checked, and (1) indicates that it is checked.
Examples
|
Forw/Backw Transl Response Factor
This is a value for how fast the ActuatorMesh reacts to user input. This input property can even be used to create a slow-down effect when the input value suddenly changes to zero – instead of the animated motion suddenly stopping. You do this by assigning a value less than (1). The ActuatorMesh will also slow down when it nears the limit of its particular path of motion, i.e. the top or the bottom. If Forw/Backw Transl Integrate box is checked, there will be a slight slow-down when you release the input device, before the ActuatorMesh stops.
Forw/Backw Transl Maximum
The maximum value for how far the ActuatorMesh can be moved forward or backward. If the Forw/Backw Transl Integrate box is checked, this value changes instead to the maximum speed. 
The picture shows different Forw/Backw Transl Maximum values when the Transl Integrate box is not checked.
Forw/Backw Transl Change Limit
Limits the ActuatorMesh‘s speed. If the Forw/Backw Transl Integrate box is checked, this value will instead determine the acceleration rate.
-
Forw/Backw Transl Keep Trinary State
When this box is checked, the ActuatorMesh will move to the endpoint in a given direction, and remain there. When the assigned button on the input device is pressed again, the ActuatorMesh will return to its starting point. This function works for movement both forward and backward. If the Forw/Backw Transl Integrate box is checked, the ActuatorMesh will accelerate to its maximum speed and continue endlessly until it receives other input. -
Forw/Backw Transl Integrate
When this box is checked, the ActuatorMesh will move freely along the current axis. Once you let go of the control the ActuatorMesh will stop at its current position and stay there.
Right/Left Transl Response Factor
This is a value for how fast the ActuatorMesh reacts to user input. This input property can even be used to create a slow-down effect when the input value suddenly changes to zero – instead of the animated motion suddenly stopping. You do this by assigning a value less than (1). The ActuatorMesh will also slow down when it nears the limit of its particular path of motion, i.e. the top or the bottom. If Right/Left Transl Integrate box is checked, there will be a slight slow-down when you release the input device, before the ActuatorMesh stops.
Right/Left Transl Maximum
The maximum value for how far the ActuatorMesh can be moved to the right or left. If the Right/Left Transl Integrate box is checked, this value changes instead to the maximum speed. 
The picture shows different Right/Left Transl Maximum values when the Transl Integrate box is not checked.
Right/Left Transl Change Limit
Limits the ActuatorMesh‘s speed. If the Right/Left Transl Integrate box is checked, this value will instead determine the acceleration rate.
-
Right/Left Transl Keep Trinary State
When this box is checked, the ActuatorMesh will move to the endpoint in a given direction, and remain there. When the assigned button on the input device is pressed again, the ActuatorMesh will return to its starting point. This function works for movement both right and left. If the Right/Left Transl Integrate box is checked, the ActuatorMesh will accelerate to its maximum speed and continue endlessly until it receives other input. -
Right/Left Transl Integrate
When this box is checked, the ActuatorMesh will move freely along the current axis. Once you let go of the control the ActuatorMesh will stop at its current position and stay there.
Up/Down Transl Response Factor
This is a value for how fast the ActuatorMesh reacts to user input. This input property can even be used to create a slow-down effect when the input value suddenly changes to zero – instead of the animated motion suddenly stopping. You do this by assigning a value less than (1). The ActuatorMesh will also slow down when it nears the limit of its particular path of motion, i.e. the top or the bottom. If Up/Down Transl Integrate box is checked, there will be a slight slow-down when you release the input device, before the ActuatorMesh stops.
Up/Down Transl Maximum
The maximum value for how far the ActuatorMesh can be moved upward or downward. If the Up/Down Transl Integrate box is checked, this value changes instead to the maximum speed. 
The picture shows different Up/Down Transl Maximum values when the Transl Integrate box is not checked.
Up/Down Transl Change Limit
Limits the ActuatorMesh‘s speed. If the Up/Down Transl Integrate box is checked, this value will instead determine the acceleration rate.
-
Up/Down Transl Keep Trinary State
When this box is checked, the ActuatorMesh will move to the endpoint in a given direction, and remain there. When the assigned button on the input device is pressed again, the ActuatorMesh will return to its starting point. This function works for movement both up and down. If the Up/Down Transl Integrate box is checked, the ActuatorMesh will accelerate to its maximum speed and continue endlessly until it receives other input. -
Up/Down Transl Integrate
When this box is checked, the ActuatorMesh will move freely along the current axis. Once you let go of the control the ActuatorMesh will stop at its current position and stay there.
Yaw (Right/Left) Response Factor
This is a value for how fast the ActuatorMesh reacts to user input. This input property can even be used to create a slow-down effect when the input value suddenly changes to zero – instead of the animated motion suddenly stopping. You do this by assigning a value less than (1). The ActuatorMesh will also slow down when it nears the limit of its particular path of motion, i.e. the top or the bottom. If Yaw (Right/Left) Integrate box is checked, there will be a slight slow-down when you release the input device, before the ActuatorMesh stops.
Yaw (Right/Left) Maximum
The maximum value for how far the ActuatorMesh can be rotated right or left. If the Yaw (Right/Left) Integrate box is checked, this value changes instead to the maximum speed.

The picture shows different Yaw (Right/Left) Maximum values when the Transl Integrate box is not checked.
Yaw (Right/Left) Change Limit
Limits the ActuatorMesh‘s speed. If the Yaw (Right/Left) Integrate box is checked, this value will instead determine the acceleration rate.
-
Yaw (Right/Left) Keep Trinary State
When this box is checked, the ActuatorMesh will move to the endpoint in a given direction, and remain there. When the assigned button on the input device is pressed again, the ActuatorMesh will return to its starting point. This function works for movement both right and left. If the Yaw (Right/Left) Integrate box is checked, the ActuatorMesh will accelerate to its maximum speed and continue endlessly until it receives other input. -
Yaw (Right/Left) Integrate
When this box is checked, the ActuatorMesh will rotate freely around the current axis. Once you let go of the control the ActuatorMesh will stop at its current position and stay there.
Pitch (Up/Down) Response Factor
This is a value for how fast the ActuatorMesh reacts to user input. This input property can even be used to create a slow-down effect when the input value suddenly changes to zero – instead of the animated motion suddenly stopping. You do this by assigning a value less than (1). The ActuatorMesh will also slow down when it nears the limit of its particular path of motion, i.e. the top or the bottom. If Pitch (Up/Down) Integrate box is checked, there will be a slight slow-down when you release the input device, before the ActuatorMesh stops.
Pitch (Up/Down) Maximum
The maximum value for how far the ActuatorMesh can be rotated upward or downward. If the Pitch (Up/Down) Integrate box is checked, this value changes instead to the maximum speed. 
The picture shows different Pitch (Up/Down) Maximum values when the Transl Integrate box is not checked.
Pitch (Up/Down) Change Limit
Limits the ActuatorMesh‘s speed. If the Pitch (Up/Down) Integrate box is checked, this value will instead determine the acceleration rate.
-
Pitch (Up/Down) Keep Trinary State
When this box is checked, the ActuatorMesh will move to the endpoint in a given direction, and remain there. When the assigned button on the input device is pressed again, the ActuatorMesh will return to its starting point. This function works for movement both up and down. If the Pitch (Up/Down) Integrate box is checked, the ActuatorMesh will accelerate to its maximum speed and continue endlessly until it receives other input. -
Pitch (Up/Down) Integrate
When this box is checked, the ActuatorMesh will rotate freely around the current axis. Once you let go of the control the ActuatorMesh will stop at its current position and stay there.
Roll (Right/Left) Response Factor
This is a value for how fast the ActuatorMesh reacts to user input. This input property can even be used to create a slow-down effect when the input value suddenly changes to zero – instead of the animated motion suddenly stopping. You do this by assigning a value less than (1). The ActuatorMesh will also slow down when it nears the limit of its particular path of motion, i.e. the top or the bottom. If Roll (Right/Left) Integrate box is checked, there will be a slight slow-down when you release the input device, before the ActuatorMesh stops.
Roll (Right/Left) Maximum
The maximum value for how far the ActuatorMesh can be rolled right or left. If the Roll (Right/Left) Integrate box is checked, this value changes instead to the maximum speed. 
The picture shows different Roll (Right/Left) Maximum values when the Transl Integrate box is not checked.
Roll (Right/Left) Change Limit
Limits the ActuatorMesh‘s speed. If the Roll (Right/Left) Integrate box is checked, this value will instead determine the acceleration rate.
-
Roll (Right/Left) Keep Trinary State
When this box is checked, the ActuatorMesh will move to the endpoint in a given direction, and remain there. When the assigned button on the input device is pressed again, the ActuatorMesh will return to its starting point. This function works for movement both right and left. If the Roll (Right/Left) Integrate box is checked, the ActuatorMesh will accelerate to its maximum speed and continue endlessly until it receives other input. -
Roll (Right/Left) Integrate
When this box is checked, the ActuatorMesh will rotate freely around the current axis. Once you let go of the control the ActuatorMesh will stop at its current position and stay there.