
Using Craft Spline Speed-Controller with splines
 Optimizing the scene Optimizing the scene
It’s wise to optimize the scene before starting to recording the animation. The scene is optimized by decreasing the amount of polygons shown during the recording. This is achieved by hiding objects not crucial to the part of the scene to be animated. Another tip is to use Craft Bounding Poly, which temporary lowers the amount of polygons for selected objects and allows for a smoother recording. |
- Create the desired spline path for Craft Spline Speed-Controller to follow.

- Create a Craft Spline Speed-Controller.
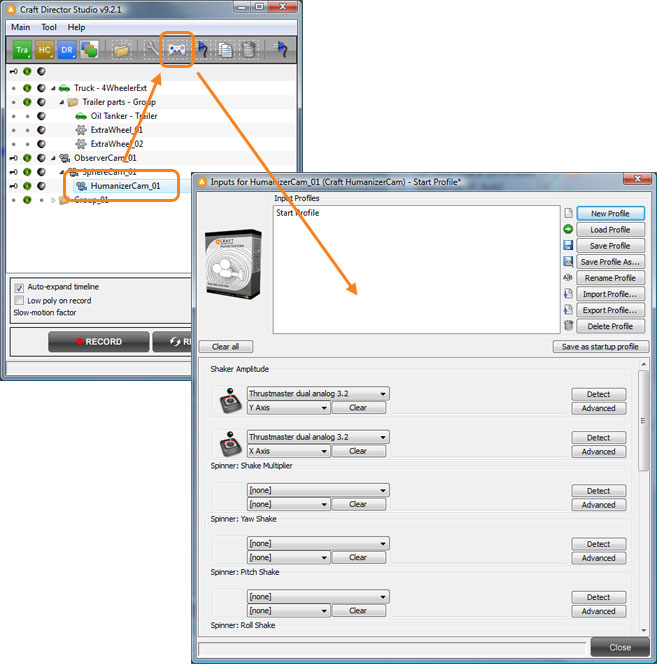
- (Optional) Configure the Input settings for Craft Spline Speed-Controller (using an analog input device is recommended).Select Craft Spline Speed-Controller in the tool tree list and click on the Input Settings button in Craft Director Studio’s main window. This will open the Input Settings window for Craft Spline Speed-Controller.
- Select the ReferenceFrame and move it to the beginning of the spline or the place on the spline where you would like Craft Spline Speed-Controller to start.
- Link/Parent the CarriageNode to the spline. The CarriageNode will snap to the closest point of the spline automatically when Record is started. Or you can enter the configuration window for Craft Spline Speed-Controller and click the button called “Snap Carriage to closest point on Curve” and the CarriageNode will snap Carriage to closest point on spline.
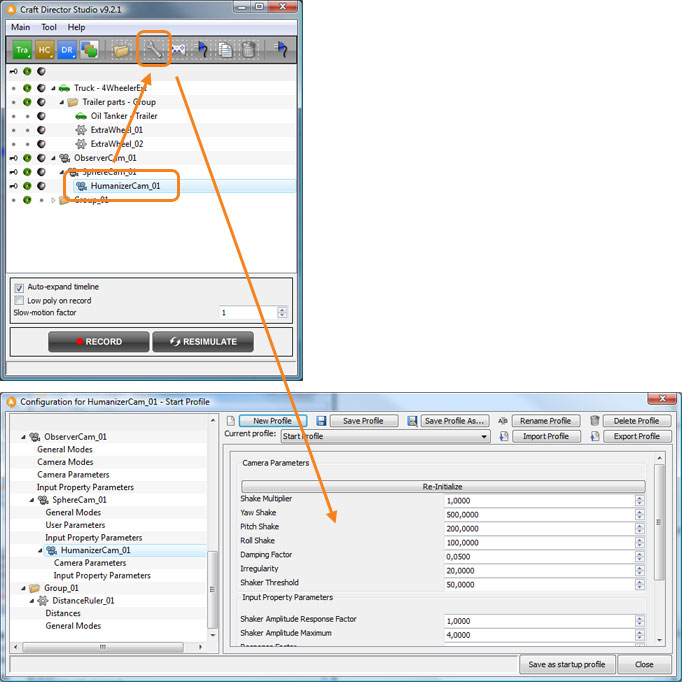
- Select Spline Speed-Controller in the Tool tree list and click the Configure button(
 ) to open the Configure window.
- In the Configure window for Craft Spline Speed-Controller click the Create New Waypoint to create a waypoint in the scene. The waypoint will be created at the start of the spline. The waypoints can be moved to any desired position on the spline. If a waypoint is moved it will snap to the closest point of the spline automatically when Record is started.

- Create the desired amount of waypoints and position them along the spline.
- Enter the configuration window for Craft Spline Speed-Controller and configure the waypoints by first selecting a waypoint in the waypoint list, then change its speed, delay and/or stop options.
- Link/Parent your Camera, TargetMesh or the object desired to the CarriageNode.

- When you are done with your waypoints, press Record to start the recording of the Carriage and if desired maneuver with the input device. You can also use Resimulate as a quicker way of creating the animation for the Carriage.
- If the recording is not satisfactory drag the timeline back to any position and continue to re-record from there. This way the entire recording does not have to be redone.
- By using the Countdown feature, you can give yourself time to move your hand to the input device and get ready before the recording starts. You can find the settings for Countdown in the Craft Director Studio Preferences. Craft Director Studio Preferences can be opened from the main menu.
- To make it easier to maneuver tricky parts in the animations, use the Slow-motion factor in Craft Director Studio’s main window.
Using Craft Spline Speed-Controller with Craft Curve
| Optimizing the scene
It’s wise to optimize the scene before starting to recording the animation. The scene is optimized by decreasing the amount of polygons shown during the recording. This is achieved by hiding objects not crucial to the part of the scene to be animated. Another tip is to use Craft Bounding Poly, which temporary lowers the amount of polygons for selected objects and allows for a smoother recording. |
- Create a Craft Spline Speed-Controller.
- (Optional) Configure the Input settings for Craft Spline Speed-Controller (using an analog input device is recommended).Select Craft Spline Speed-Controller in the tool tree list and click on the Input Settings button in Craft Director Studio’s main window. This will open the Input Settings window for Craft Spline Speed-Controller.
- Select Spline Speed-Controller in the Tool tree list and click the Configure button() to open the Configure window.
- In the Configure window for Craft Spline Speed-Controller click the Create New Waypoint to create a waypoint in the scene. Create waypoints and position them where you want them. Finally, in the “Craft Curve Generation” group of the configuration window, click “Create Curve” to create the curve that illustrates the path that the CarriageNode will use.

- Position CarriageNode where you want it to begin or click Initialize Carriage in the Configuration window to move the CarriageNode to the beginning of the curve.
- Link/Parent your Camera, TargetMesh or the object desired to the CarriageNode.
- When you are done with your waypoints and rigging, press Record to start the recording of the Carriage and, if desired, maneuver with the input device. You can also use Resimulate as a quicker way of creating the animation for the Carriage.
- If the recording is not satisfactory drag the timeline back to any position and continue to re-record from there. This way the entire recording does not have to be redone.
- By using the Countdown feature, you can give yourself time to move your hand to the input device and get ready before the recording starts. You can find the settings for Countdown in the Craft Director Studio Preferences. Craft Director Studio Preferences can be opened from the main menu.
- To make it easier to maneuver tricky parts in the animations, use the Slow-motion factor in Craft Director Studio’s main window.
Input settings
Forward/Backward
Accelerates the CarriageNode forward or backward on the spline.

Start
If a waypoint is set to Stop Mode this input is used for starting the CarrigageNode movement again.
Look At Target
Orients the CarriageNode so that it’s pointing towards the previous (the waypoint the CarriageNode has passed) waypoint’s lookAtTarget.
Forced Stop
Forces the Carriage to stop at its current position.
Configure
General Modes
Hide Helpers During Recording
Hides the Helpers during recording.
Snap To Spline During Recording
If the spline is animated this mode can be used so that the CarriageNode and the waypoints snap to the spline during recording.
Waypoints
Create New Waypoint
Creates new waypoints.
Remove Selected Waypoint
Removes the selected waypoint from the scene.
Waypoint Creation Position (in Percent)
The Waypoint creation position (in percent) after previous Waypoint.
Make all waypoints equal to Waypoint01
Copies the first waypoint’s parameters to all the other waypoints.
Use Simplified Parameters
Overrides the waypoint specific parameters and uses the first waypoint’s values for all waypoints.
Snap Waypoints to Spline/Redraw Craft Curve
Snaps all waypoints to the Spline or, if using Craft Curve, redraws the curve.
Waypoints (drop down list)
Lists all the waypoints. Select a waypoint to edit its preferences.
Selected Waypoint
Craft Curve CV Tensions
Tension In
A tension in to the Waypoint, only used when using Craft Curve generation.
Tension Out
A tension out from the Waypoint, only used when using Craft Curve generation.
Position on Spline (in Percent)
The Waypoint position on Spline in Percent. 0% = Start of Spline. 100% = End of Spline.
Speed
Determines the maximum velocity the CarrigeNode is to have after the specific waypoint.
Time Delay (frames)
The length of time (in number of frames) the CarrigeNode will stop at waypoint. If you choose this option the waypoint will be colored orange to indicate that it is a waypoint with delay.
Time Delay (seconds)
The length of time (in seconds) the CarrigeNode will stop at waypoint. If you choose this option the waypoint will be colored orange to indicate that it is a waypoint with delay.
Stop Mode
Makes the CarrigeNode stop at the waypoint.
If you choose this option the waypoint will be colored red to indicate that it is a waypoint with Stop Mode on. Use the Input configured for “Start” to start the Carriage again.
Look at Target
If checked, the carriage will look at the target (Waypoint##_lookAtTarget) instead of being oriented with the spline. Applied after the waypoint.
Gyro Mode only
CarriageNode will remain ‘level’ – i.e. only do translation and no rotations. Applied after the waypoint
Yaw Mode only
CarriageNode will remain ‘level’ – i.e. only do yaw rotations and no pitch rotations. Applied after the waypoint
Acceleration Response Factor
How fast the Maximum Acceleration of the Carriage is applied after the waypoint. 0 = disables rotation. 1 = applied instantly.
Maximum Acceleration
Set the maximum acceleration for the Carriage after the current waypoint. Applied after the waypoint
Rotation Response Factor
How fast the Max Rate Of Change is applied after the waypoint. 0 = disables rotation. 1 = applied instantly. Lower value makes smoother rotations. Applies after the current waypoint.
Rotation Max Rate Of Change
The maximum rotation change in radians per second after the current waypoint.
Brake Softner
Determines how softly the CarriageNode comes to a stop before the waypoint. Only applied if Stop Mode or Time Delay is active.
Brake Percent
Determines at what point the Carriage are to starts decelerating between the previous waypoint and current. (Percentage of the distance between previous Waypoint and current Waypoint). Only applied if Stop Mode or Time Delay is active.
Carriage Properties
Initialize Carriage
Moves the Carriage to the beginning of the spline (or curve).
Snap Carriage to closest point on Curve
Moves the Carriage to the closest point on the spline (or curve) and moves Waypoints to their spline positions (or creates the curve along the waypoints).
Gravity Strength
Adds a gravity to the Carriage, so that it acts more like a rollercoaster. A value of zero will disable it.
Banking Factor
Adds gravity dependent banking to the Carriage. A value of zero will disable it.
Loop
When the CarriageNode reaches the end of the spline it will start from the beginning again.
Craft Curve Generation
Use Craft Curve Generation
If checked, a curve will automatically be created using in/out tension of the waypoints.
Create Curve
Creates a curve using the waypoints.
Remove Curve
Removes the curve from the scene.
Closed Curve
If checked, the curve will be closed.
End Curve Straight
If checked, the curve will straighten out to the last waypoint.
Input Properties
Forward/Backward Maximum Speed
Sets the maximum speed of the carriage when an input to control it.
Speed Units
Selected Speed Units
The speeds used in the simulation will be in the selected units. Regardless of scale of the Carriage or ReferenceFrame.
Speed Multiplier
Adds a multiplier to the Carriage speed. Useful when scaling a clone.