Activating the evaluation period for a tool
Follow the steps below to activate the evaluation period of a tool. All tools’ evaluation periods are individual so you have 1 week each to test them.
- Start Craft Director Studio.
- Create a tool.
- If there is no valid license for that tool, this window will appear:

- Click evaluate to begin the evaluation period and have the tool created.
Craft Director Studio Main Window
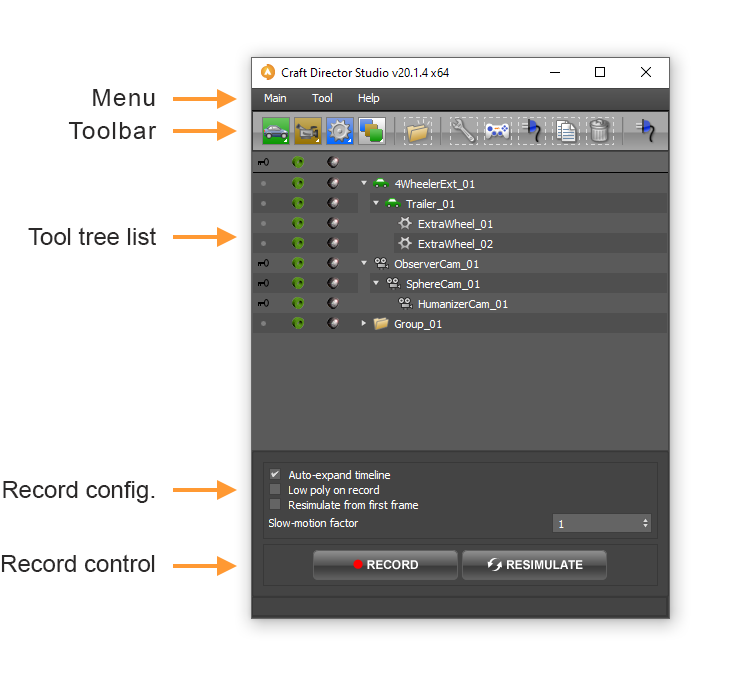
This is the main Craft Director Studio window where all the functions and controls for Craft Director Studio are located.
Menu
Main

Create Vehicle tool
From this menu you can select a tool from the Vehicle category to be created.
Create Camera tool
From this menu you can select a tool from the Camera category to be created.
Create Accessory tool
From this menu you can select a tool from the Accessory category to be created.
Create Template tool
From this menu you can select a tool from the Template category to be created.
Browse…
Browse for .prm files. A .prm file is a Pre-Rigged Model file which can contain multiple Craft tools, rigging information, a custom configuration window and even a high poly model.
Unplug All Objects
Removes all Craft Director Studio connections from the scene but keeps the animation made with them. This can be very useful when sending a scene to a render farm so that the scene is no longer dependent on the tool.
License Manager
Opens the License management dialog. This can be used to see license information, activating or modifying licenses.
Preferences
Opens the main configuration for Craft Director Studio.
Close
Closes the Craft Director Studio’s main window.
Tool

Configure…
To make changes in the tools’ configurations the Configure menu is used. The Configure window will open for the tool that is selected in the tool tree list.
Inputs…
Opens the Input Settings window. This window is used to bind an input device of your choice to control the selected tool.
Delete (selected tool)
Deletes the selected tree/tool from the scene.
Clone (selected tool)
Clones the selected tree/tool. Everything but the animation is copied.
Help

Help…
Launches the help documentation in your web browser.
Tool Help Documentation
Launches the help documentation for the tool you selected in your web browser.
Craft Animations Website…
Opens https://craftanimations.com in your web browser.
Craft Animations Forum…
Opens http://forum.craftanimations.com in your web browser.
About…
Shows the about window with information about Craft Director Studio.
Toolbar

Create a new tool from the Vehicle category
| Popout menu where you can select a tool from the Vehicle category to be created. Hold down the button to open the popout. After a tool is created it is also placed as a quick button. Hold down again to choose some other tool.
Alternative ways to add a new vehicle tool
|
Create a new tool from the vehicle tool category
| Popout menu where you can select a tool from the Camera category to be created. Hold down the button to open the popout. After a tool is created it is also placed as a quick button. Hold down again to choose some other tool.
Alternative ways to add a new camera tool
|
Create a new tool from the accessory tool category
| Popout menu where you can select a tool from the Accessories category to be created. Hold down the button to open the popout. After a tool is created it is also placed as a quick button. Hold down again to choose some other tool.
Alternative ways to add a new accessory tool
|
Create a new tool from the template tool category
| Pop-out menu where you can select a tool from the Template category to be created. Hold down the button to open the pop-out. After a template is created it is also placed as a quick button. Hold down again to choose some other template. |
Create a new group
 |
Creates a group in the tool tree list. (This will not group the tools in the scene, only in the Craft Director Studio’s main window). |
Configure [selected object]
 |
Opens the Configure window for the selected tool. |
Input settings for [selected object]
 |
Opens the Input settings window for the selected tree/tool. |
Unplug [selected object]
 |
Unplug selected converts the selected tree/tool’s animation into regular key frames and makes it/them completely independent from Craft Director Studio. |
Clone [selected tree/tool]
 |
Clone the selected tree/tool, cloning it and its children but not its animation. The clone will be placed in the exactly the same position as its source. |
Delete [selected object]
| Deletes the selected tree/tool.
Alternative ways to save
|
Unplug all objects
 |
Unplug all Craft Director Studio connected object’s and makes the scene completely independent from Craft Director Studio and the animations created by the tools are converted into regular key frames. This feature is excellent to use before sending a scene to a render farm, if the farm does not have Craft Director Studio installed.Alternative way to Unplug all objects:
|
Tool tree list

The tool tree list contains all Craft Director Studio tools available in the scene. You can drag tools around to change their order (aesthetic only) and their hierarchy.
Keyframing (on/off)
  |
Keyframing [on], the tool will be keyframed during record/resimulate. Keyframing [off], will not be keyframed. |
Show low poly (on/off)
  |
Low poly [on], shows low poly objects in the scene connected to Craft Director Studio. Low poly [off], hides them. |
Show high poly (on/off)
  |
High poly [on], shows high poly objects in the scene connected to Craft Director Studio. High poly [off], hides them. |
Deleting tools
Select a tool/tree in the tool tree list and click the delete button to delete a tool/tree ( ![]() ).
).
Record configuration

Auto-expand timeline
By checking Auto-expand timeline the recording will automatically prolong the timeline during animation.
Low poly on record
If this check box is checked then only the dummy models will be used during recording.
Slow-motion factor
Controls the recording speed. Each increment in the slow motion factor will reduce the recording speed by half.
Record control

Record
Starts the recording animation. The animation will be recorded in real-time, so if you’re experiencing frame rate issues make sure you’re not using too advanced settings on the tools or that you’re scene is too high detailed. Hiding objects not crucial to the part you’re about to animate is a great way to gain performance.
Resimulation
If configuration settings are changed after a recording has been made, pressing the Resimulate button will update the animation. Resimulate will use the input values from the previous recording and animation will change according to the new attribute values.
Main Preferences

How to open
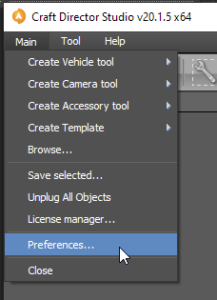
The Craft Director Studio settings / preferences are found under Main -> Preferences…
Recording
Start countdown time – Use this to set a countdown time until record. This makes it easier for the user to be able to grasp the input device before the actual animation recording starts.
General
Silent mode – Suppresses error messages.
Always on top – If checked the windows and dialogs of Craft Director Studio is always on top.
Licenses
Verify licenses on startup – This is not recommended when using floating licenses.
Host application specific settings
Use dynamic meshes – Makes the tools read the dependent meshes on each frame. This is needed for example if you have a 4-Wheeler driving on an animated ground. Performance will decrease if turned on.
Use optimized transform controller (only in 3ds Max) – If the checkbox is checked the Craft Director Studio system will use its own animation recording system for keyframes. If turned off the performance will decrease.
Convert all controllers to default PRS controller (only in 3ds Max) – Converts the keyframes created by Craft Director Studio’s motion controller to regular PRS controllers so that it is possible to manually edit the keyframes.
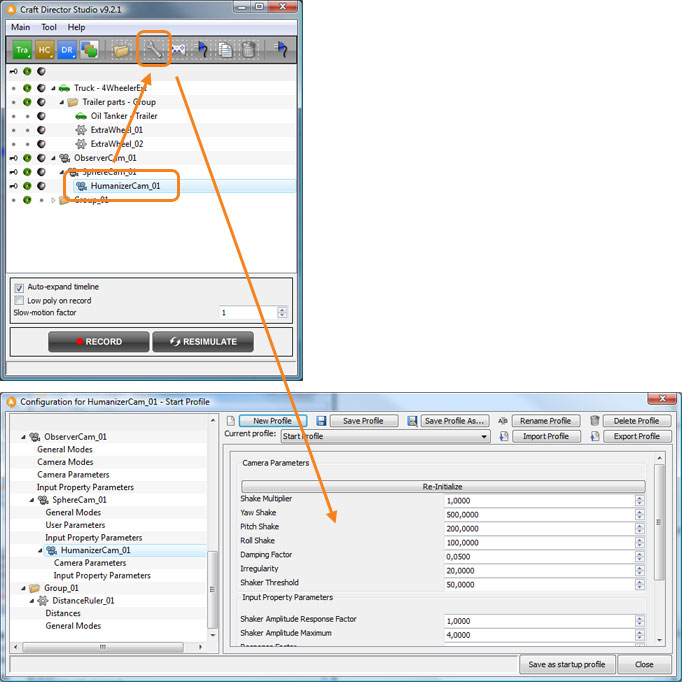
Configure
Change the settings on the selected tool by clicking on the Configure button in the Craft Director Studio window.
Edit a value
Edit a value by clicking on it and typing in the desired value. It is also possible to click and drag with the mouse to change a value. It is possible to change a value much faster while click+dragging. To change a value 10x faster you are able to use Ctrl or Shift. To change a value 100x faster use Ctrl and Shift. To cancel a change during click drag you right-click.
Reset to the default value
You are always able to get the default value of an property by right-clicking on the spinner of that value (right-click the small up/down arrows next to the value).
Configure Profiles
Profiles are designed to save and load specific configurations. The Start Profile is the profile which is loaded automatically when a new tool has been created.

Load profile
![]()
This drop down box displays the currently loaded profile. If you switch to some other profile in the list it will automatically be loaded.
New Profile
| Creates a new profile and copies the Factory settings profile in to the new one. |
Save Profile
| Saves the active profile with its changes. |
Save Profile As…
| Save the current configuration to a new profile. |
Rename Profile
| Rename the current profile. |
Delete Profile
| Deletes the current profile. |
Import Profile
| Gives the user the possibility to import configuration profiles from a file. |
Export Profile
| Exports the current configuration to a file. |
Input settings
Select the tool you wish to change controls for. Click on Input settings button in the Tool bar in Craft Director Studio’s main window to open the Input settings window.
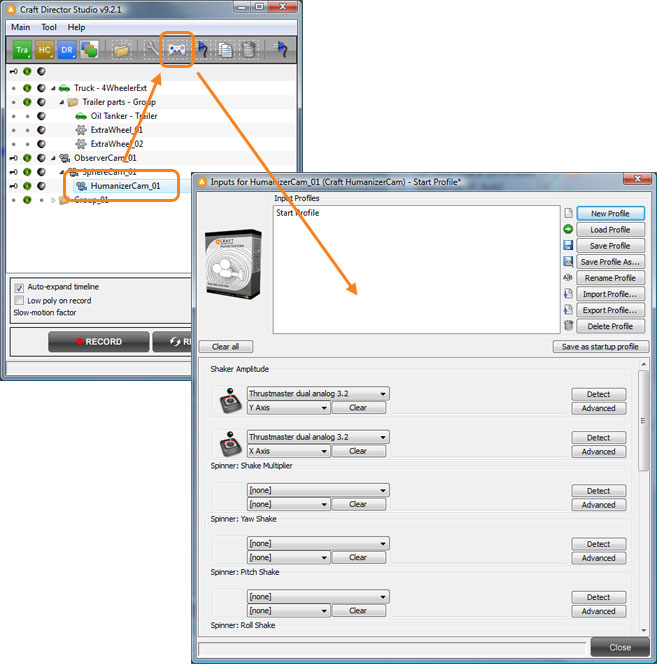
How to configure an input

Adjust a desired control by clicking on its Detect button and then press/move the desired controller. It is also possible to change the controller manually by selecting input device and button. Use the Clear button to clear the settings.
Input device
This drop down allows you to choose the input device that is going to be used by the input.
Button
This drop down allows you to choose the button desired for the selected device.
Detect
The easiest method to configure the input setting is to use the automatic function that recognizes which device is being used. Click the Detect button in the settings for that particular movement. In order to set the control properly, move the axis on the controller in the direction indicated by the first word in the parenthesis or press the desired button. This prevents the control to steer backwards. Click Ok to confirm the detected device.
Advanced
This button will open a new window where it is possible to change the input’s output value.

Input Profiles
Profiles are designed to save and load specific configurations. The default profile is the profile which is loaded automatically once a new tool has been created.
How to load a input profile
You load an input profile by first selecting the desired profile in the profile list and then clicking the Load Profile button. You are also able to load a profile by double clicking it in the profile list.

How to save an input profile
A. Save over active profile:
You save the active profile and its recent changes by clicking the Save Profile button.

B. Save active setting over old profile:
You save over an old input profile by first selecting the desired profile in the profile list and then by clicking the Save Profile button.
C. Save active setting as a new profile:
You save the active input profile as a new profile by clicking the Save Profile As… button.

New Profile
| Creates a new profile and copies the Start Profile settings in to the new one. |
Save Profile
| Saves the active profile with its changes. |
Save Profile As…
| Save the current input setting to a new profile. |
Rename Profile
| Rename the selected profile. |
Delete Profile
| Deletes the selected profile. |
Import Profile
| Gives the user the possibility to import input profiles from a file. |
Export Profile
| Exports the current configuration to a file. If a profile is selected in the profile list this will be exported to the file. |
License Manager
In the License Manager you are able to see information about, refresh and activate licenses.
Click on the License Manager… via the Main menu to open the License Manager.

Status
Displays the current status of the license.
Please note! If “Verify licenses on startup” in Craft Director Studios’ preferences is unchecked, the status for the licenses will not have been updates. Go to Main -> Refresh to update the status of all licenses.
Valid to
Shows the up to version number of Craft Director Studio that the current license supports.
Expiry
Shows the date the current license will expire.
Host information – HostIds
This text box displays one of your MAC-addresses and is used by Craft Animations for generating licenses.
Activation
Use this text box to enter your product activation code and the button to activate the license. If the activation code is accepted the product will start working immediately.
Activate serial key
If you have received an activation code this allows you to enter a serial key to activate your node-locked license.
Import license file
Use this function to browse and import a .lic license file.
Please note! Depending on your permissions you might need to manually place the license in the correct folder in order for it to import.