Craft 4-Wheeler Free
Manual


Craft 4-Wheeler Free is a simulator for 4-wheel vehicles. This animation tool makes it easy for the user to create realistic simulations for vehicles in motion. The vehicle is controlled with an input device directly through the 3d application. The user links the model that will be rendered to Craft 4-Wheeler Free for it to inherit it’s movement. Steering, braking, boosting, skidding, etc. is performed in real-time with a DirectX input device, keyboard or 3dxmouse. All Craft 4-Wheeler parameters can be altered in real time and may create some very peculiar car shape changes during recording.

The surface on which Craft 4-Wheeler Free drives can take any shape, be upside down or twist oddly. Surfaces can even be animated during recording with Craft 4-Wheeler Free.

Craft 4-Wheeler Free can also be combined with other products from Craft Director Studio. For example: it is possible to use Craft Extra Wheel and Craft Trailer together with Craft 4-Wheeler Free to create a truck.

Using Craft 4-Wheeler Free

 Optimizing the scene

It’s wise to optimize the scene before starting to recording the animation. The scene is optimized by decreasing the amount of polygons shown during the recording. This is achieved by hiding objects not crucial to the part of the scene to be animated. Another tip is to use Craft Bounding Poly, which temporary lowers the amount of polygons for selected objects and allows for a smoother recording.

  1. Create a Craft 4-Wheeler Free.
  2. Configure the controls for Craft 4-Wheeler Free (using an analog input device is recommended).

    Select the Craft 4-Wheeler Free in the tool tree list and click on the Input settings button in the tool bar. This will open the input settings window for Craft 4-Wheeler Free.
    Read more about Input settings >>.
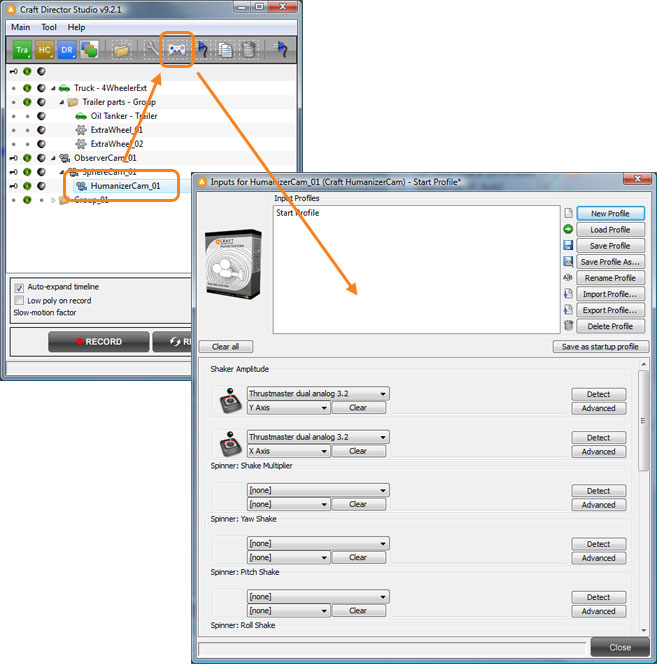
  3. Align Craft 4-Wheeler Free’s chassis (4WheelerFree_01_CarBodyMesh) at the same position as the high poly model’s chassis. It might be wise to use wireframe mode so that only the outlines are visible. Keyboard shortcut for wireframe in 3ds Max is F3, CINEMA4D: N~G and 4 for Maya.
  4. Move and rescale Craft 4-Wheeler Free’s chassis so that it is placed in the same position and has the same size as the high poly model’s chassis.
  5. Align Craft 4-Wheeler’s wheels to the wheels on the high poly model. Make sure that they are centered in the middle of the high poly model’s wheels.
  6. Rescale Craft 4-Wheeler Free’s wheels so that they’re the same size as the high poly model’s wheels.
  7. Link/Parent the high poly model’s chassis to Craft 4-Wheeler Free’s 4WheelerFree_01_CarBodyMesh.
  8. Link/Parent the high poly model’s wheels to each of Craft 4-Wheeler Free’s respective wheel.
  9. To make sure that the recording runs a smooth as possible, hide all the high poly model’s parts ().
  10. Link/Parent the arrow behind Craft 4-Wheeler Free (4WheelerFree_01_GravityDirectionMesh) to the surface. The vehicle will then follow this surface.
    Please note: It can only be bound to one surface.
  11. To get a better view when maneuvering Craft 4-Wheeler Free, change viewport to one of the following cameras:
    • DriverCam which is placed approximately at the height of a drivers head in an ordinary car. Its position can be changed if needed.
    • TopCam follows the car 25 scaled units above the roof helping the driver to perform pinpoint navigation in tight spaces.
    • FollowCam follows the car smoothly from a third person view.
  12. Click Record in Craft Director Studio’s main window to start recording. Maneuver Craft 4-Wheeler Free with the input settings configured earlier and drive the desired route. Craft 4-Wheeler Free’s movement will be saved during the duration of the recording. Click Stop to stop the recording.
    • If the recording is not satisfactory drag the timeline back to any position desired and continue to rerecord from there. This way the entire recording does not have to be redone.
    • By using the Countdown feature, it’s possible to grasp the input device and get ready before the recording starts (you can find the Countdown setting in the Main Configuration).
    • To make it easier to maneuver tricky parts in the animations, use the Slow-motion factor in Craft Director Studio’s main window.
  13. Unhide the high poly model.
  14. Render.

› Back to top

Input settings


Gas Pedal

Drives the vehicle forward.


Brake

The vehicle will brake as much as possible without locking the wheels until it comes to a stop. If a digital input (i.e. a button) is used, you will brake with full force directly. If an analog input used, you’re able to control how much force you’re braking with.

Reverse

Drives the vehicle forward.


Steering Wheel (Right/Left)

Turns the vehicle right or left.

Nitro

Gives the vehicles a boost in velocity.


Hand Brake

Locks the wheels and brakes the vehicle until it comes to a stop.


Burnout

The rear wheels spin to create a burnout.


› Back to top

Configure

General Settings

Acceleration (in Percent)
A percent value that determines how strong and fast the engine is. 100% equals maximum acceleration. A lower percentage value equals lower acceleration.

Top Speed
A percent value that determines how fast the vehicle is. 100% equals maximum speed. A lower percentage value equals lower top speed.

Maximum Steering Angle
The maximum angle of the steering wheel.

Brake Force (in Percent)
A percent value that determines how strong the brakes are. 100% equals maximum brake force. A lower percentage value equals lower brake force.

› Back to top

Vehicle Settings

Suspension (in Percent)
A percent value that determines how much force and damping the springs have. 100% equals maximum stiffness and damping. 0% equals very low stiffness and damping.

Weight (in Percent)
A percent value that determines how much the vehicle weighs. 100% equals maximum weight. A lower percentage value equals lower weight.

› Back to top