Using Craft CrawlerTracks
 Optimizing the scene Optimizing the scene
It’s wise to optimize the scene before starting to recording the animation. The scene is optimized by decreasing the amount of polygons shown during the recording. This is achieved by hiding objects not crucial to the part of the scene to be animated. Another tip is to use Craft Bounding Poly, which temporary lowers the amount of polygons for selected objects and allows for a smoother recording. |
- Start by creating a Craft Crawler Extended.
- Rig it with your high-poly tank (follow the instructions on how to use Craft Crawler Extended).
- Create a Craft ExtraWheel (one of our Free Utilities – Craft ExtraWheel is automatically included in your software bundle).
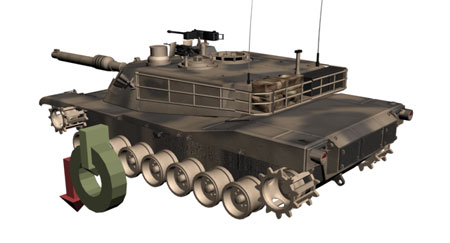
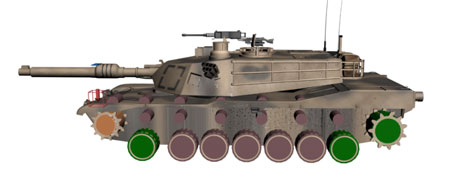
- Move and rescale the Craft Extra Wheel so that it is placed in the same position as one of the middle high-poly tank’s wheels. The size of the Craft ExtraWheel should be larger than the high-poly tank’s wheel. Its radius should be the same as the radius of the high-poly tank’s wheel plus the thread height.
- Clone the Craft ExtraWheel (
 ) and align the Craft ExtraWheels to the next high-poly wheel. Continue to clone and align until you have Craft ExtraWheels on all the middle wheels (the lower outer wheels do not need to be driven by Craft ExtraWheels because they are going to be animated with Craft Crawler Extended).Make sure that each Craft ExtraWheel is centered in the middle of its respective high-poly wheel.
- Link/Parent the Craft ExtraWheels ChassisSuspensionMeshs to CrawlerExt_ChassisRelocator.
- Link/Parent the high-poly wheels to each of the Craft ExtraWheels so they inherit the movement.
- Hide all the dummy objects by using the low poly toggle button (
 ).
). - Create a Craft CogWheels (one of our Free Utilities – Craft CogWheels is automatically included in your software download). The function of the Craft CogWheels is to transfer the rotation from the Craft Crawler Extended to the Craft CrawlerTracks later on.
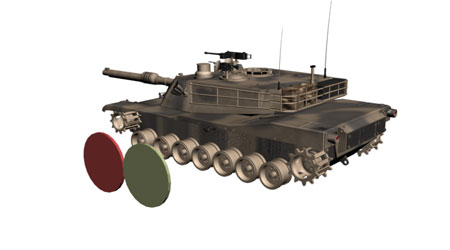
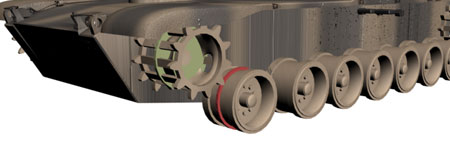
- Rescale and align the CogWheels_ActiveCog (the red disc) to the lower front high-poly wheel. This is the wheel that is driven by Craft Crawler Extended’s front wheel, not one of the wheels driven by Craft ExtraWheel. Be sure to place the CogWheels in the center of their respective high-poly wheels – i.e. not at the edges (see picture below).
- Rescale and align the CogWheels_PassiveCog (the green disc) to the upper front wheel.If the track after simulation seems to go faster or slower than the upper front wheel try to rescale the CogWheels_PassiveCog and resimulate again. Larger CogWheels_PassiveCog = slower rotation of the upper front wheel.
- Link/Parent the CogWheels_ActiveCog (the red disc) to the lower front dummy wheel.
- Link/Parent the CogWheels_PassiveCog (the green disc) to CrawlerExt_ChassisRelocator
- Link/Parent the upper high-poly wheel to the CogWheels_PassiveCog (the green disc).
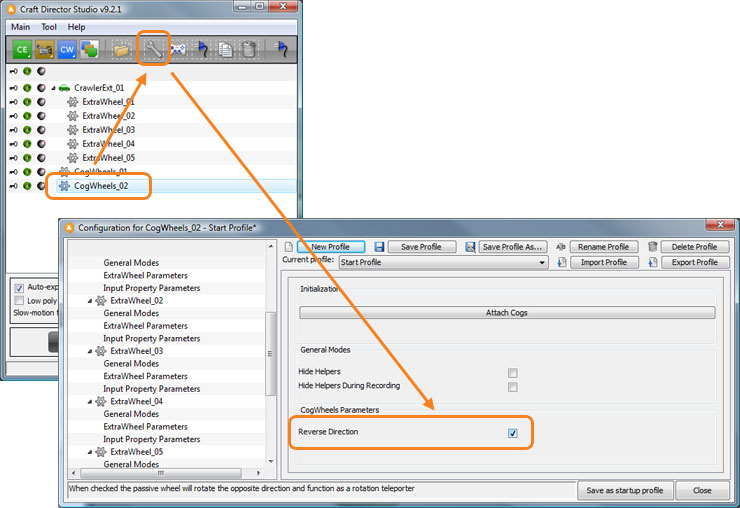
- Depending on the orientation of the scene it may be needed to open the Configure window for Craft CogWheels and check the Reverse Direction checkbox so that the CogWheels_PassiveCog rotates in the same direction as the CogWheels_ActiveCog.
- Hide the Craft CogWheels by clicking on the toggle low poly icon ().
- Hide the high-poly model by clicking on the toggle high-poly icon (
 ).
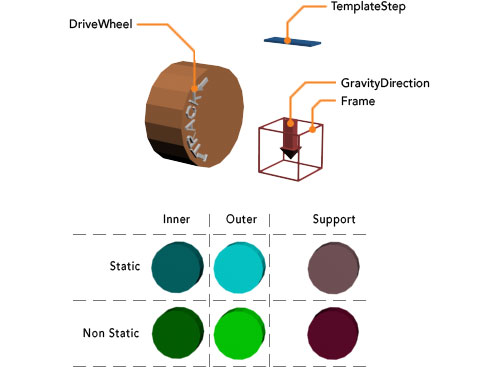
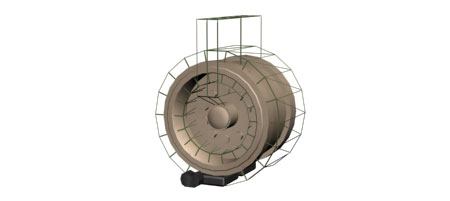
). - Create a Craft CrawlerTracks.
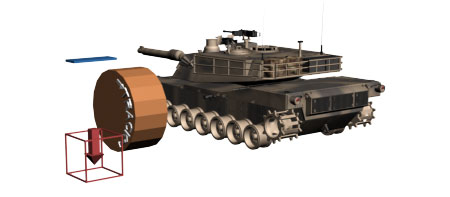
- Rescale the CrawlerTracks_Frame so that the CrawlerTracks_driveWheel roughly has the same size as the intended goal wheel. In this case the upper front high-poly wheel.
- Select CrawlerTracks_driveWheel and align it with CogWheels_PassiveCog and scale it to fit the upper front high-poly wheel.
- Link/Parent CrawlerTracks_driveWheel with CogWheels_PassiveCog.
- Unhide the high-poly model by clicking on the toggle high-poly icon ().
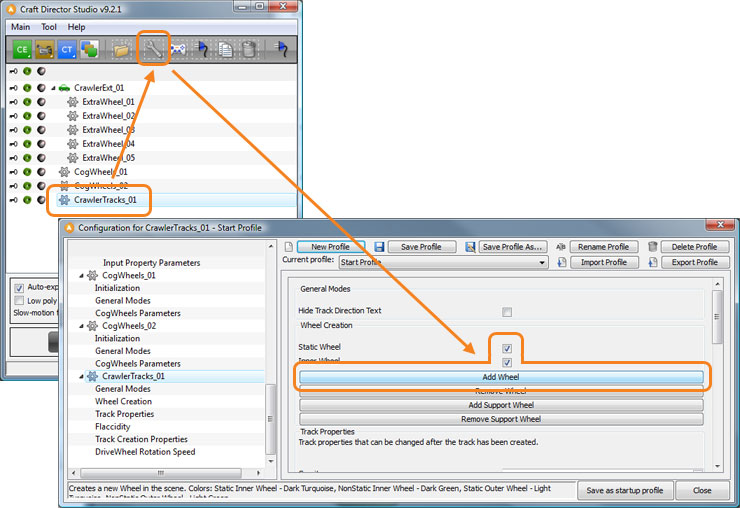
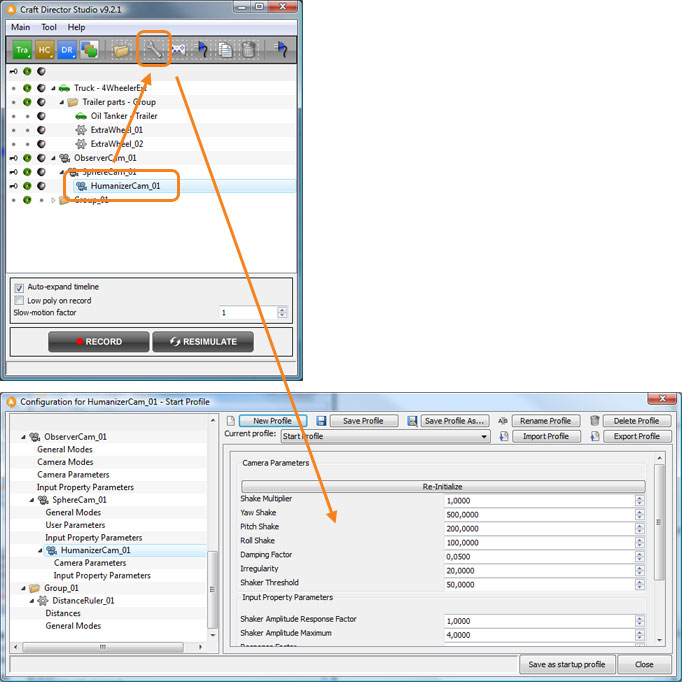
- In Craft Director Studio main window, select CrawlerTracks in the tool tree list and click Configure in the toolbar.
- Make sure that “Inner Wheel” and “Static Wheel” are checked. Now click the button “Add Wheel”.
- Keep the configuration window open, and select the wheel that was just created. Align it with the high-poly upper back wheel.
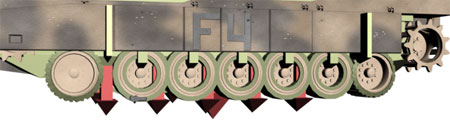
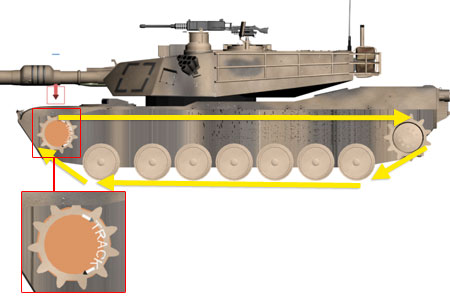
- Link/Parent the high-poly upper back wheel to CrawlerTracks_bogie1.Notice the white text on Craft CrawlerTracks’s driveWheel. This text indicates the direction in which each successive wheel is created. The tracks will subsequently be bound around all of the bogies in the order in which they were created. In the picture below the tracks go from the from the front bogie (far left) – clockwise – and continue on the back bogie (far right). If you were to place the second bogie immediately behind the first bogie the tracks would malfunction.
- Click “Add Wheel” in Craft CrawlerTracks configuration window.
- Select the newly created wheel in the scene and align it to the lower high-poly back wheel. Match the wheel’s scale as well.
- Click “Add Wheel” again in Craft CrawlerTracks configuration window.
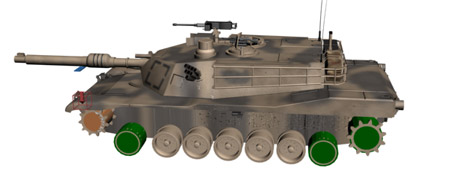
- Select the newly created wheel in the scene and align it to the lower high-poly front wheel. Match its scale too. Your tank should now look something like the one below:
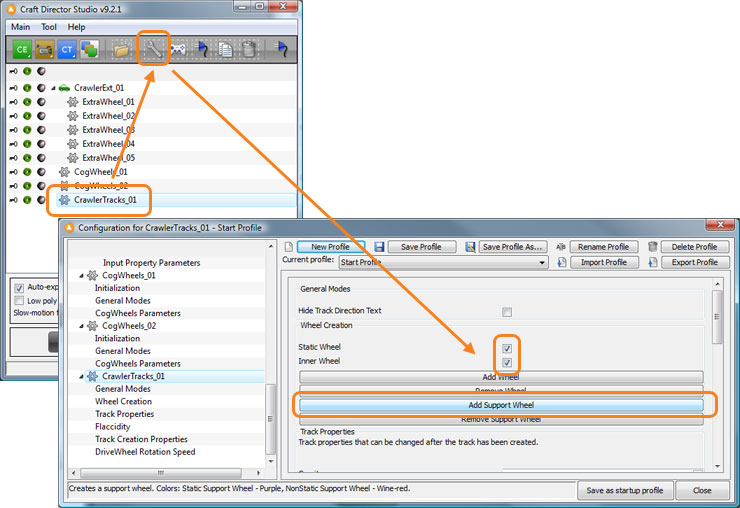
- Make sure that “Inner Wheel” and “Static Wheel” is checked. Click “Add Support Wheel” in Craft CrawlerTracks configuration window. There is no specific creation order for support wheels unlike when creating ordinary wheels.
- Create Support wheels for the rest of the wheels, align them and match their scale.

- Create Support wheels between the two upper wheels, for the track to rest on so that it doesn’t sway up or down too much Note that there are Support Wheels above the track as well. The track itself won’t be able to detect the body of the tank, so this is the only way to keep the track from bounding up and intersecting with the tank body.
- Select CrawlerTracks_TemplateStep and match its size with the high-poly step. Keep in mind that the hinge part of the high-poly step will be in the gap between the steps so it should be outside the template step.

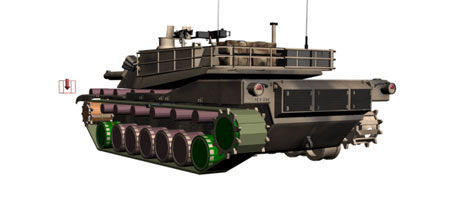
- Select all of the red arrows, GravityDirectionMesh (select *Gravity*) and link/parent them to the ground object you intend to drive on.
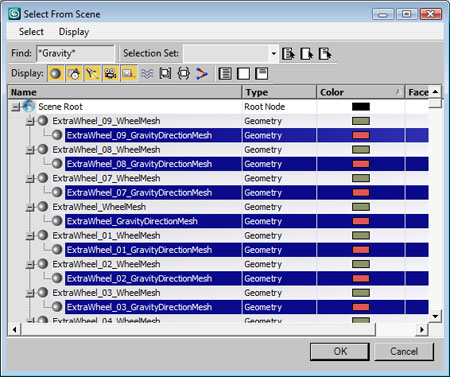
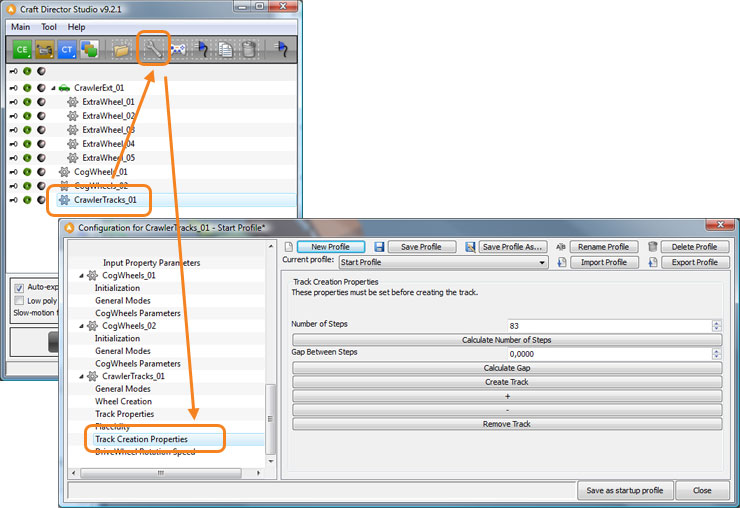
Please note: A GravityDirectionMesh can only be bound to one surface. - In Craft CrawlerTracks configuration window, enter the Track Creation Properties for your tank. You can use the buttons “Calculate Number of Steps” to calculate the number of steps automatically. Finally click the button “Create Track”. If you need more or less steps you can click the +/- buttons to have the track updated right away.
Important: You will need to re-create the track in order to re-configure any of the other options under “Track Creation Properties”.
- Hide the high-poly model by clicking on the toggle high-poly button ().
- To get a better view when maneuvering the tank, change viewport to one of the following cameras:
- DriverCam which is placed approximately at the height of a drivers head in an ordinary tank. Its position can be changed if needed.
- TopCam follows the tank 25 scaled units above the roof helping the driver to perform pinpoint navigation in tight spaces.
- FollowCam follows the tank smoothly from a third person view.
- Recording all these tools at the same time will require a very powerful machine so it is recommended that you uncheck all (
 ) of the checkboxes in the tool tree list except for “Crawler” (
 ) to begin with.
 - Click Record in Craft Director Studio’s main window to start recording. Maneuver Craft Crawler Extended with the input settings configured earlier and drive the desired route (Craft Crawler Extended can also be configured to follow a spline). Craft Crawler Extended’s movement will be saved during the duration of the recording. Click Stop to stop the recording.
- If the recording is not satisfactory drag the timeline back to any position desired and continue to re-record from there. This way the entire recording does not have to be redone.
- If you use the Countdown feature, you can have a small window of time between pressing Record and the actual beginning of the recording. That gives you time to move your hand over to the joystick or whatever input device you use (you can find the Countdown setting in the Main Configuration).
- To make it easier to maneuver tricky parts in the animations, use the Slow-motion factor in Craft Director Studio’s main window.
- Once you have recorded a path for your tank, uncheck () “Crawler” in the tool tree list and check () the rest of the tools and click Resimulate. When Craft CrawlerTracks has been recorded (or Resimulated), it will clone out all the high-poly steps.
- Unhide the high-poly model and hide the dummy model ( and ).
- Render.
Input settings
Forward/Backward
Rotates the DriveWheel forward or backward.
Configure
General Modes
Hide Track Direction Text
Hides the track direction text.
Wheel Creation
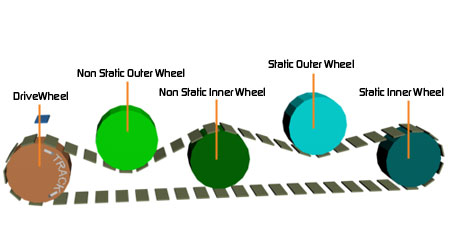
Static Wheel
If this checkbox is checked, the wheel will not rotate with the driveWheel.
Inner Wheel
If this checkbox is checked, the wheel is created as an inner wheel otherwise it’s an outer wheel.
Add Wheel
Adds a wheel to the CrawlerTrack with the settings selected above.
Remove Wheel
Removes the wheel created last. To remove a wheel you must first remove the track around it (use the button in the “Track Creation Properties” below).
Add Support Wheel
Adds a support wheel. Support wheels can be used to keep the track from bouncing too much or restrict it from reaching certain areas by forming a wall of support wheels which will block the track.
Remove Support Wheel
Removes the last created support wheel. To remove a wheel you must first remove the track around it (use the button in the “Track Creation Properties” below).
Track Properties
Gravity
How much the gravity affects the track.
Bending Stiffness
Sets the bending stiffness for each track step. A higher value equals more stiffness.
Bending Damping
Sets the bending damping for each track step. A higher value equals more damping.
Displacement Stiffness
Sets the displacement stiffness for each track step. A higher value equals more stiffness.
Displacement Damping
Sets the displacement damping for each track step. A higher value equals more damping.
Twist Stiffness
Sets the twist stiffness for each track step. A higher value equals more stiffness.
Twist Damping
Sets the bending damping for each track step. A higher value equals more damping.
Friction
The friction between the tracks and the ground.
Select All Steps in Tracks
Clicking this button will select all the steps of the track.
Flaccidity
Accuracy
Sets the accuracy of the simulation. Increase to make the simulation more accurate.
WARNING! Can slow down the simulation considerably. Another tip is to increase the amount of SubFrames when Resimulating.
Flaccidity Reduction Factor
Sets the flaccidity of the track.
SubFrames
Sets the number of subframes of the simulation (similar to increasing the fps).
Set keyframes on SubFrames
Enables the simulation to set keyframes on each subframe.
Track Creation Properties
Number of Steps
Sets number of steps to be created.
Calculate Number of Steps
Calculates the number of steps needed with the gap specified and current wheel setup.
Gap Between Steps
Sets a specific gap between the steps.
Calculate Gap
Calculates the gap needed with the number of steps specified and current wheel setup.
Create Track
Creates the track.
+
Adds a step to the track.
–
Removes a step from the track.
Remove Track
Removes the track.
DriveWheel Rotation Speed
Maximum (Input Driven) Rotation Speed
Set how fast the DriveWheel will rotate on input.