3ds MAX
Tire tracks
Description: This is a script that can be used to generate tire track particles.Create a PF Source for each tire and place it slightly above the tire bottom and then link the PF Source to the respective “WheelCenterMesh”.
- For each PF Source Replace the Birth operator with a BirthScript operator for the PF Source in the Particle Flow dialog,
- Press the “edit script” button and replace the code with this code.
- Add a Cache operator and set it to “use at: viewport/render”
- For geometry create an instance of your tire track and replace Shape with Shape Instance and select the instance you wish to output, eg a face with your track mark.
- Below in the “on Init pCont do” function set the “initFrame” as the start frame.
- Change $’PF Source 01′ to the name of your PF Source.
- Set the distance to be slightly smaller than your geometry.
- Before rendering you must play back the whole scene for the particles to be correctly cached.
Also play back with “Real Time” unchecked in the “Time Configuration” dialog.
on ChannelsUsed pCont do
    (
        pCont.useTime = true
        pCont.useAge = true
        pCont.usePosition = true
        pCont.useOrientation = true
        pCont.useSpeed = true
    )

    on Init pCont do
    (
       global initFrame = 40f --sliderTime as float
       global PFSource = $'PF Source 01'
       global distBetweenParticles = 0.3

       global initTime = initFrame as float
       global distToPrevParticle = 0.0
       global PFEuler = 0.0

    )

    on Proceed pCont do
    (
       sTime = sliderTime as float
       previousParticlePos =  pCont.particlePosition
       previousParticleTime =  pCont.particleTime

       if( sliderTime < initFrame + 1f and sliderTime >= initFrame) then
       (
          pCont.AddParticle()
          pCont.particleIndex = pCont.NumParticles() -- last particle that was added
          pCont.particleTime = sTime
          pCont.particleAge = 0
          pCont.particlePosition = PFSource.pos
          PFEuler = PFSource.rotation as eulerAngles
          pCont.particleOrientation = [PFEuler.x,PFEuler.y,PFEuler.z]
          pCont.particleSpeed = [0, 0, 0]
          previousParticlePos =  pCont.particlePosition
          previousParticleTime =  pCont.particleTime
       )
       if( sliderTime >= initFrame + 1f) then
       (
          particlesSinceLastDrop = ((length (PFSource.pos - previousParticlePos))/distBetweenParticles) as float
          particlesSinceLastDrop_int = particlesSinceLastDrop as integer
          i = particlesSinceLastDrop as integer
          while ( i > 0) do
          (
             pCont.AddParticle()
             pCont.particleIndex = pCont.NumParticles() -- last particle that was added
             pCont.particleTime = previousParticleTime + (particlesSinceLastDrop_int + 1 - i)*(sTime - previousParticleTime)/(particlesSinceLastDrop)
             pCont.particleAge = 0
             pCont.particlePosition = previousParticlePos + (particlesSinceLastDrop_int + 1 - i)*(PFSource.pos - previousParticlePos)/(particlesSinceLastDrop)
             PFEuler = PFSource.rotation as eulerAngles
             pCont.particleOrientation = [PFEuler.x,PFEuler.y,PFEuler.z]
             pCont.particleSpeed = [0, 0, 0]
             i = i - 1
          )
       )
    )


    on Release pCont do
    (

    )
VRay – Combining Craft Cameras with VRayPhysicalCamera in Autodesk 3ds Max
Description: The guide below will show how to connect a Craft Camera together with VRayPhysicalCamera.
- Create a VRayPhysicalCamera.

- Disable the targeted checkbox so that the VRayPhysicalCamera isn’t pointing at a target. Also note that its film gate (mm) value is set to 36. We will get to this later.

- Create the desired Craft Camera. Here we select the Craft Zoom&FocusCam but any camera can be combined with VRay’s cameras.

- Select ZoomAndFocusCam_01_Camera and go to the Modify tab. Change the Lens: value to the same as the film gate (mm) value of the VRayPhysicalCamera that was created previously.

- Next is to link the Target Distance values of the two cameras. Right-click the ZoomAndFocusCam_01_Camera in the scene and select Wire Parameters.
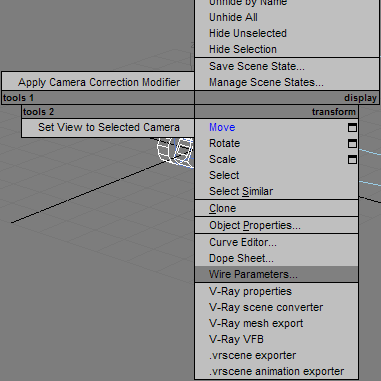
- Select Target Distance in the menu that appears.
- An ant trail will follow the mouse cursor. Click VRayPhysicalCamera01 and a menu will appear…

- …from the Object (VRayPhysicalCamera) menu, select target_distance.

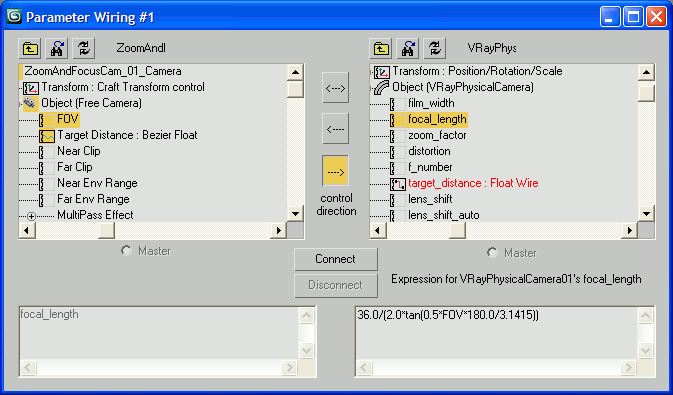
- A new window will open. In the Parameter Wiring window, click the —> arrow and click Connect.

The window will change into this. Don’t be alarmed by the red ‘target_distance: Float Wire’, it just illustrated that this value is now being controlled by something else (in this case: the Craft Camera’s Target Distance value).
- Next up, we’re going to link up the Field of View/Lens value of the two cameras. This requires some math but don’t worry, we’ve done the calculations for you so you don’t need to bring out your calculator.
- Right-click the ZoomAndFocusCam_01_Camera in the scene and select Wire Parameters again.
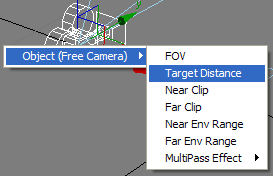
- From the Object (Free Camera) menu, select FOV.

- With the ant trail following the cursor, click the VRayPhysicalCamera and then select focal_length from the Object (VRayPhysicalCamera) menu.

- The Parameter Wiring window will open again. Click the —> arrow like last time and now comes the math part. Instead of ‘FOV’ in the right text box, type in:
36.0/(2.0*tan(0.5*FOV*180.0/3.1415))
Notice the 36.0 at the start of the expression. This is the film gate (mm) value from the start of the guide. If you’re using a different value than 36, you will need to change the expression accordingly. Finally click Connect.
The window should update and look like this.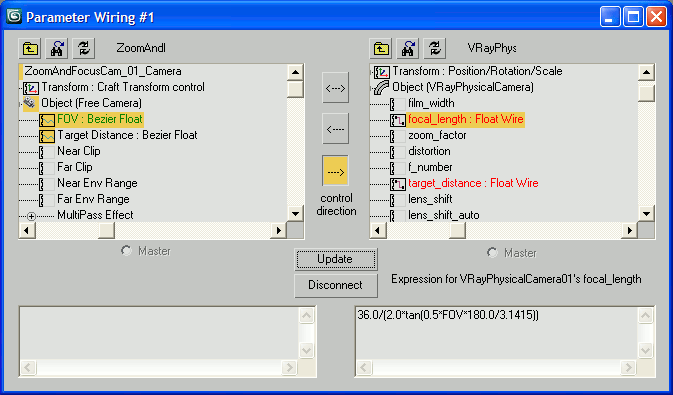
- Now you can close the window and align VRayPhysicalCamera01 on top of ZoomAndFocusCam_01_Camera and link them together.
The VRayPhysicalCamera will then inherit all of the Craft Camera’s motion, along with the Target Distance and FOV values. Record the Craft Camera like you normally would and render using the VRayPhysicalCamera.
Maya
Quick align in Maya
Usage: Select the the object you wish to move, then shift-select the object you want it to get aligned to (it aligns to its pivot).
{
    // Author: Luigi Tramontana @ Craft Animations
    // AT: Align Translations
    // Usage: Select the the object you wish to move, then shift-select the object you wish it to get aligned to (it aligns to its pivot).

    string $nodes[] = `ls -selection`;
    float $pos[] = `xform -query -worldSpace -scalePivot $nodes[1]`;;
    move -worldSpace ($pos[0]) ($pos[1]) ($pos[2]) $nodes[0];
};
You can select the script text in the Script Editor and drag it to a shelf spot to create a shortcut for it. Select MEL when prompted for MEL/Python.
Align Camera to current view
This is a very useful script when working with cameras in Maya. It moves the selected camera to your current view and parents it to that camera (except when it’s the persp-camera).
Usage: Select the camera you want to move to the current view.
{
    // Author: Luigi Tramontana @ Craft Animations
    // MCP: Move Camera and Parent selected camera
    // Usage: Select the camera you want to move to the current view

    string $currPanel = `getPanel -withFocus`;
    string $currCamera = `modelPanel -q -camera $currPanel`;

    // Save the current position of the current camera.
    string $homeName = `cameraView -camera $currCamera`;

    // Get selection list. Gets listed in the selection order.
    string $nodes[] = `ls -selection`;
    if( `camera -q -orthographic $currCamera` == 0) // if not orthographic continue
    {
                    // Make the selected camera identical to the current view.
                    cameraView -e -camera $nodes[0] -sc $homeName;

                    // Look through the selected camera.
                    lookThroughModelPanel $nodes[0] $currPanel; //lookThroughModelPanelClipped $nodes[0] $currPanel 0.001 1000;
                    if( `strcmp $currCamera persp` != 0) // if not persp camera, parent selected camera to it
                    {
                                    // Parent the selected camera to the current.
                                    parent $nodes[0] $currCamera;
                    }
    }
};
You can select the script text in the Script Editor and drag it to a shelf spot to create a shortcut for it. Select MEL when prompted for MEL/Python.
Incremental Save
Usage: Saves your current scene as a new file with its last two numbers increased by one, or if there are no numbers at the end adds ” 01″ to the file name.
{

    // Author: Luigi Tramontana @ Craft Animations
    // S++: Incremental Save
    // Usage: Saves your current scene as a new file with its last two numbers increased by one, or if there are no numbers at the end adds " 01" to the file name.

    $currentFilePathName = `file -q -sceneName`;
    $currentFileType = `file -q -type`;
    $fileType = endString( $currentFilePathName, 3);
    $currentBaseName = basenameEx( $currentFilePathName);
    $lastTwoChars = endString( $currentBaseName, 2);

    if( strcmp( $lastTwoChars, "99") == 1)
    {
      $currentFilePathName = startString( $currentFilePathName, `size $currentFilePathName` - 3)  + " 01" + $fileType;
    }
    else
    {
       $lastTwoCharsAsIntIcr = (int) $lastTwoChars;
       $lastTwoChars = "";
       $lastTwoCharsAsIntIcr = $lastTwoCharsAsIntIcr + 1;

       if( $lastTwoCharsAsIntIcr < 10)
       {
          $lastTwoChars = (string) 0;
       }

       $lastTwoChars = $lastTwoChars + (string) $lastTwoCharsAsIntIcr;
       $currentFilePathName = startString( $currentFilePathName, `size $currentFilePathName` - 5)  + $lastTwoChars + $fileType;

    }

    file -rename $currentFilePathName;
    file -save -type $currentFileType;

};
You can select the script text in the Script Editor and drag it to a shelf spot to create a shortcut for it. Select MEL when prompted for MEL/Python.
VRay – Combining Craft Cameras with VRayPhysicalCamera in Autodesk Maya
Description: The guide below will show how to connect a Craft Camera together with VRayPhysicalCamera.
- Create the desired Craft Camera. Here we select the Craft Zoom&FocusCam but any camera can be combined with VRay’s cameras.
- Create a Camera from Maya’s Create menu.

- Select your newly created camera and when on the shape node go to: Attributes>VRay>Physical camera.

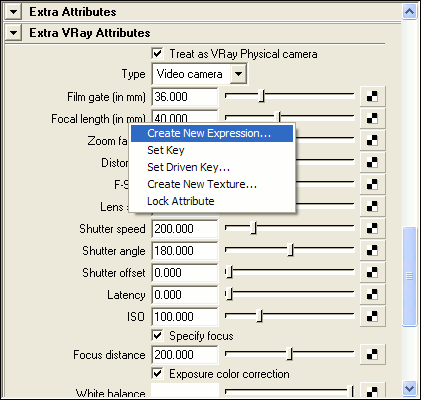
- Check the Treat as VRay Physical Camera checkbox.

- Right-click in the Focal length (in mm) value field and select Create New Expression…
A new window will appear.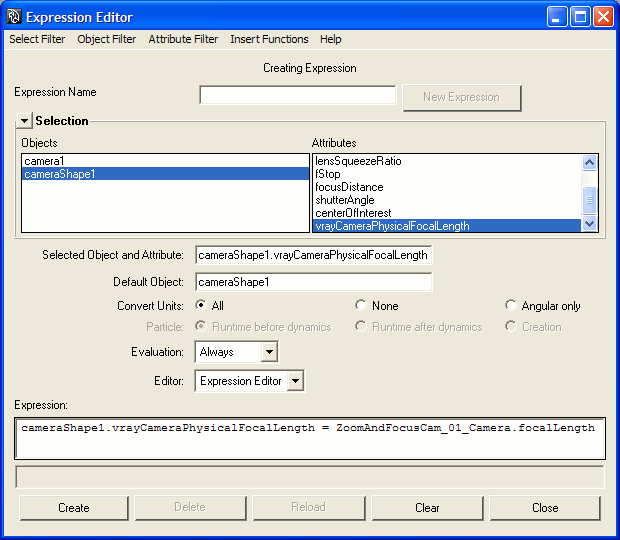
- In this Expression Editor window, in the Expression: field, type in:
cameraShape1.vrayCameraPhysicalFocalLength = ZoomAndFocusCam_01_Camera.focalLength(Please Note that you need to change the ZoomAndFocusCam_01_Camera part of the expression if you’re using another Craft Camera so that the name matches accordingly. Click Create and then Close.)
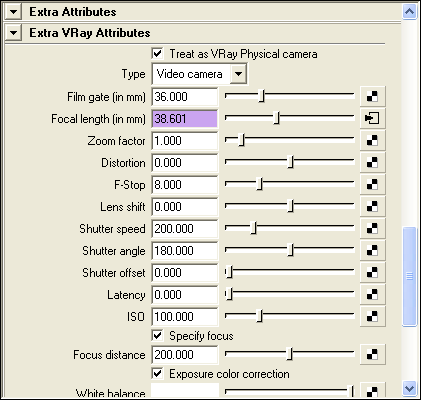
Notice that the Focal length (in mm) value field has turned purple. It will now update its value automatically using the Craft Camera’s focal length value.
- Record the Craft Camera like you normally would and render using the VRayPhysicalCamera.