Installing
Craft Director Studio® uses Reprise License Manager (“RLM”) as it’s license manager. You can run multiple RLM servers on the same server machine.
The server is compatible with Windows, Linux and Mac OS X 64-bit systems.
If you need a more in depth details on how to administrate the license server you can find the manual http://www.reprisesoftware.com/RLM_License_Administration.pdf
Please follow these steps to install the license server:
Windows
- Download the license server package
- On the server, extract the downloaded .zip file
- Run “Craft License Server.exe” and following the steps during the installation.
- When the installation is finished, copy the server license file (filename ending with “_server.lic”) that was included in the delivery email to the folder the RLM license server were installed to (it is defaulted to C:\Program Files\Craft Animations\license_server_x64).
- (Optional) Configure the ports you like for the license to use. The ports that are used as default are 5054 for HTTP web service, 5053 for the license service and a dynamic port for the ISV server. Read more on how to set specific port for the license server.
Linux
- Download the license server package
- Extract the downloaded package to a desired installation folder.
- Copy the server license file (filename ending with “_server.lic”) that was included in the delivery email to the same installation folder specified in previous step.
- (Optional) Configure the ports you like for the license to use. The ports that are used as default are 5054 for Web Administration service, 5053 for the license service and a dynamic port for the ISV server. Read more on how to set specific port for the license server.
- (Only for virtual servers) If running on a virtual server you may need to force network device naming to eth0 (or any combination up to eth7) as this is required by the license server. Read more on how to set (external website)
Mac OS X
- Download the license server package
- Extract the downloaded package to a desired installation folder.
- Copy the server license file (filename ending with “_server.lic”) that was included in the delivery email to the same installation folder specified in previous step.
- (Optional) Configure the ports you like for the license server to use. The ports that are used as default are 5054 for license administration web service, 5053 for the license service and a dynamic port for the ISV service. Read more on how to set specific port for the license server.
back to top
The ports that are used as default are:
- 5054 for the RLM Web administrator interface
- 5053 for the license service
- A dynamic port for the ISV server (vendor daemon).
How to change the License Service Port
- Edit the server license (copied during step 3 during the install of the server, the file ending with “_server.lic”) in notepad/Textedit or similar text editor.
- Add the desired port number after “HOST localhost <server mac-address>” like the following:
HOST localhost <server mac-address> <portnumber>
For example “HOST localhost 11aa33bb55cc 29000” to set it to use port number 29000 instead of the default 5053.
- Save file and restart the server.
How to specify the ISV Port
- Edit the server license (copied during step 3 during the install of the server, the file ending with “_server.lic”) in notepad/Textedit or similar text editor.
- Add the desired port number after “ISV craftanim” like the following:
ISV craftanim port=<portnumber>
For example “ISV craftanim port=29001” to set it to use port number 29001 instead of the randomly set port number.
- Save file and restart the server.
How to change the Web Administration Interface port
This is set with an attribute added during the start of the RLM License server. Please refer to the “Running the license server” section as this is set with a command when starting the server.
back to top
Starting the license server
Windows
Start from Start Menu
- Open the start menu and navigate to “Craft Animations”.
- Use “Start manually” option to start the server.
Run as service
The installation for windows will automatically add the server as a service (unless unchecked during install). If needed, here are the steps on how to set-up the license server as a service.
- Open start menu and type “cmd” to find the command prompt.
- Right click in Command Prompt and select “Run as administrator”.
- When you have opened the Command Prompt navigate the to license server location. If installed to the default location you can use the following command:
cd C:\Program Files\Craft Animations\license_server_x64
- To add as a service and start the server run the following command:
rlm.exe -dlog +"servicelog.txt" -install_service -service_name "Craft License Server"
- (Optional) To run a different port for the web administration tool add:
-ws <portnumber>
where <portnumber> are to be changed to the desired port number (For example: rlm.exe -dlog +”servicelog.txt” -install_service -service_name “Craft License Server” -ws 5050).The server should now be up and running as a service.
Linux
Start from Terminal
- Open the Terminal and navigate to the directory the Craft License Server was installed to.
- Start the server by typing the following terminal command:
$ ./rlm -c <licensefile> -dlog +"servicelog.dl"
where the <licensefile> is replaced by the server license file name (for example ./rlm -c 0800278a0215_server.lic -dlog +”servicelog.dl”). This command can be slightly different depending on the Linux distribution you are running.
- (Optional) To run a different port for the web administration tool add:
-ws <portnumber>
where <portnumber> are to be changed to the desired port number (For example: ./rlm -c 0800278a0215_server.lic -dlog +”servicelog.dl” -ws 5050).
- The server should now be up and running.
Run as service
On most Unix systems, system services are started at boot time, usually via startup scripts located in /etc/rc.<something>. For example, on Solaris, the startup script might be placed in /etc/rc2.d/S98rlm. On Linux systems, the script could be located in /etc/init.d/rlm, with a link to /etc/rc5.d/S98rlm. Note that you must install this startup script as root.
The startup script should su to a different user so that the rlm servers are not running as root.
And example of a Unix startup script for the rlm server:
#! /bin/sh
#
# rlm Start/Stop rlm
#

#----------------------------------------------------------------
#----------------------------------------------------------------
#----------------------------------------------------------------
# NOTE:
# NOTE: Configure these 5 variables for your system
# NOTE:

# Set rlmuser to the user under which rlm will run
rlmuser=joe

# Set rlmdir to the directory where the rlm binary is found
rlmdir=/home/joe/rlm/

# Set rlmdir to the directory where the rlmdown binary is found
rlmdowndir=$rlmdir

# Set licfile to the path to the license file
licfile=$rlmdir/0800278a0215_server.lic

# Set debuglog to the path to the debug log
debuglog=+$rlmdir/servicelog.dl
#----------------------------------------------------------------
#----------------------------------------------------------------
#----------------------------------------------------------------

start() {
echo $debuglog
	su - $rlmuser -c "$rlmdir/rlm -c $licfile -dlog $debuglog &"
}

stop() {
	su - $rlmuser -c "$rlmdowndir/rlmdown RLM -q"
}

case "$1" in
 start)
 start
	;;
 stop)
 stop
	;;
 restart)
	stop
	sleep 2
	start
	;;
 *)
	echo $"Usage: $0 {start|stop|restart}"
	exit 1
esac

exit 0
Mac OS X
Start from Terminal
- Open the Terminal and navigate to the directory the Craft License Server was installed to.
- Start the server by typing the following terminal command
rlm -c <licensefile> -dlog +"servicelog.log" &
where the <licensefile> is replaced by the server license file name (for example ./rlm -c 0800278a0215_server.lic -dlog +”servicelog.log” &).
- (Optional) To run a different web service port add
-ws <portnumber>
where <portnumber> are to be changed to the desired port number (For example ./rlm -c 0800278a0215_server.lic -dlog +”servicelog.log” -ws 5050).
- The server should now be up and running
Run as service
On Mac systems, the server can be started by placing a script in /Library/LaunchDaemons.
The following is an example of a script which would start rlm at boot time on Mac systems. Note that this script must be placed in the /Library/LaunchDaemons directory, and it must have an extension of .plist.
You should change /PATH/TO/RLM/ to the path to the rlm server binary and /PATH/TO/LICENSE/0800278a0215_server.lic to you license file. You can add additional arguments if needed:
<?xml version="1.0" encoding="UTF-8"?>
 <!DOCTYPE plist PUBLIC "-//Apple//DTD PLIST 1.0//EN" "http://www.apple.com/DTDs/PropertyList-1.0.dtd">
 <plist version="1.0">
 <dict>
        <key>Craft License Server</key>
        <string>com.craftanimations.rlm</string>
        <key>ProgramArguments</key>
        <array>
        <string>/PATH/TO/RLM/rlm -c /PATH/TO/LICENSE/0800278a0215_server.lic -dlog /PATH/TO/RLM/servicelog.log -ws 5054</string>
        </array>
        <key>RunAtLoad</key>
        <true/>
 </dict>
 </plist>
back to top
Renewal of existing license or adding additional licenses
If you have received a new license file for renewal of an existing license, please follow these steps:
- Add the new license file received to the same folder without replacing any excising license file.
- Restart the license server.
- Done
back to top
How to add Craft licenses to an existing RLM server
In order to add Craft licenses to an existing RLM server you need to do the following:
- Download the craftanim binary to use with the existing RLM license server.
- Extract and place the “craftanim” binary (“craftanim.exe” for windows) in the RLM license server folder.
- Copy the server license file (filename ending with “_server.lic”) that was included in the delivery email in the RLM license server folder.
- Restart the license server.
- Done
back to top
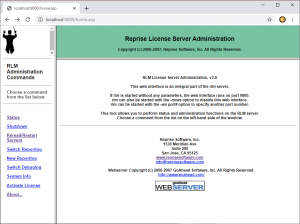
License Manager
You open the License Manager vi a web-browser and enter
http://localhost:5054
If you specified a different web service port when starting the server, please change the 5054 to the port configured.
If you need a more in depth details on how to administrate the license server you can find the manual http://www.reprisesoftware.com/RLM_License_Administration.pdf
Status of the licenses, users etc.
- Click on Status in the left menu.
- In the craftanim row click on the button under Server Status to see the status of the licenses.
Here you are able to see if the licenses server are running the licenses correct.
- count: Shows you how many licenses you have on this server
- inuse: shows how many of the licenses are currently used by users
- userlist button: In here you are able to see which workstations are currently using licenses and if needed release licenses
Workstation set-up
Manual setup
PLEASE NOTE! If you are planning to run license server and workstation on the same machine you need to be install Craft Director Studio in a different folder than the license server as it will not work otherwise.
Windows
- Download 21.1.1 version of Craft Director Studio
- Install Craft Director Studio
- Create or copy a client license pointer license file in Craft Animations license folder (default location: C:\Program Files\Craft Animations\licenses). More details on the Client License Pointer can be found below.
- Start Craft Director Studio from your host program (i.e. 3ds Max, Maya).
- Create a professional tool (i.e. 4-Wheeler Extended). If no pop-up is shown the license if functioning as intended.
- (Optional Step) When using floating licenses, it can be good set Craft Director Studio to not verify licenses on startup of the 3D program as this will otherwise fetch and occupy a license until the 3D program is closed. Here is how you set this:
- Open the Main Preferences from the Main menu of Craft Director Studio.
- Uncheck the “Verify licenses on startup”
- Close the 3D program to save the setting.
- Done
A client license server pointer or a environment variable must be set-up on workstation computers to be able to fetch a license as it serves as a pointer to the server so the workstations will know where to look and fetch for floating licenses.
Option 1 – Client License Pointer File
Attached in the delivery email you can find a client license file. If you provided a host name it should already be correct however, you may need to edit it to work. If you need to edit the file open it through notepad/text edit or similar text editor.
Here is how the client license pointer is structured.
HOST <server ip or hostname of the server> 0 <port number>
- <server ip or hostname> = IP number to the server or the server host name, For example “192.168.1.3”, “LicenseServer”.
- <port number> = license server port number to use. Default is 5053
Here are two examples:
HOST LicenseServer 0 5053
HOST 241.48.75.107 0 5053
If you created the file from scratch make sure to save the file as a .lic file. For example: “Craft.lic”
Optionally, you can use the license tool to create the server connection automatically. On your client computer, download the license tool from: https://craftanimations.com/craftlicensetool/ Install and run it. Once running, create a new server connection and specify the server name. If you are able to connect with the server a green indicator is shown next to your server connection. However, you need to make sure that you can see “directorstudio vXX.X” (where “XX.X” is the version number. For example “directorstudio v20.3”) under “Available products”. If you can, rour client computer is now correctly connected to the server. please note, that even if it shows a green indicator it might be that you need to open additional ports between the server and the workstation as the Craft License Tool does not check all ports to validate.
Option 2 – Environment Variable
Instead of a licenser server pointer file you can use environment variables to make the workstations find the license server.
To set-up the license pointer System Environment Variable:
- Open the System Properties by opening the start menu and type “edit the system environment variables” and click on the “edit the system environment variables”.
- In the System Properties window click on the “Environment Variables…” button in the lower part of the “Advanced” tab
- In the Environment Variables window under System variables hit “New…” to open the New System Variable dialog.
- In the dialog enter “RLM_LICENSE” as Variable name and set the value to “<port number>@<server_hostname_or_ip>” for example “5053@licenseserver” or “28000@192.168.0.2”.
- Hit OK to create the variable
- Hit OK to close and save the changes made to the Environment Variables.
- Done
Silent install
Windows
Right now, I am sorry to say our installer does not support silent mode. In order to deploy CDS in batch, you need to do some manually right now:
- Install CDS on a reference machine
- Install a floating client license pointer file in the CDS license folder (default location for windows: C:\Program Files\Craft Animations\licenses).
- Make the desired settings in CDS for each instance of 3D program used and close the 3D program to save the setting (for instance “verify licenses on startup”, more info on this setting can be found further down. There is no need to do this step for rendering nodes as rendering does not require a license).
On this machine, extract the following items:
- The plugin file installed on the host applications plugins folder (in 3ds max its a .gup file located in the plugins folder, in Maya it’s a .mll file located in the bin/plug-ins folder.
- The 32-bit registry in
- HKEY_LOCAL_MACHINE\Software\Craft Animations
- The CDS system folder (usually located in C:\Program Files\Craft Animations) (For render nodes you should not include the license server pointer as CDS does not require a license for rendering)
- If you like to copy specific settings for CDS you can also make sure to copy the settings.json file located in the CDS system folder “C:\Program Files\Craft Animations\directorstudio” (if not visible, please start Craft Director Studio and change and save a setting in the preferences and it will be created). It is for instance useful for “verify licenses on startup” setting (see Verify licenses on startup below for more details).
- Optional: Instead of using a license server pointer file you can use Environment Variables to make the workstations find your license server.
Place these items onto the target computers on the same locations, and CDS will be able to run.
In the future, we plan to better support silent installations.
Verify licenses on startup
When using floating licenses, it can be good set Craft Director Studio to not verify licenses on startup of the 3D program as this will otherwise fetch and occupy a license until the 3D program is closed. Here is how you set this:
- Open “settings.json” in a notepad or similar text editor located in “C:\Program Files\Craft Animations\directorstudio” (if not visible, please start Craft Director Studio and change and save a setting in the preferences and it will be created).
- Find “verifyonstart”:true and change “true” to “false“.
- Save the file and close
- Copy the settings file to each workstations that are to use the same settings.
back to top